
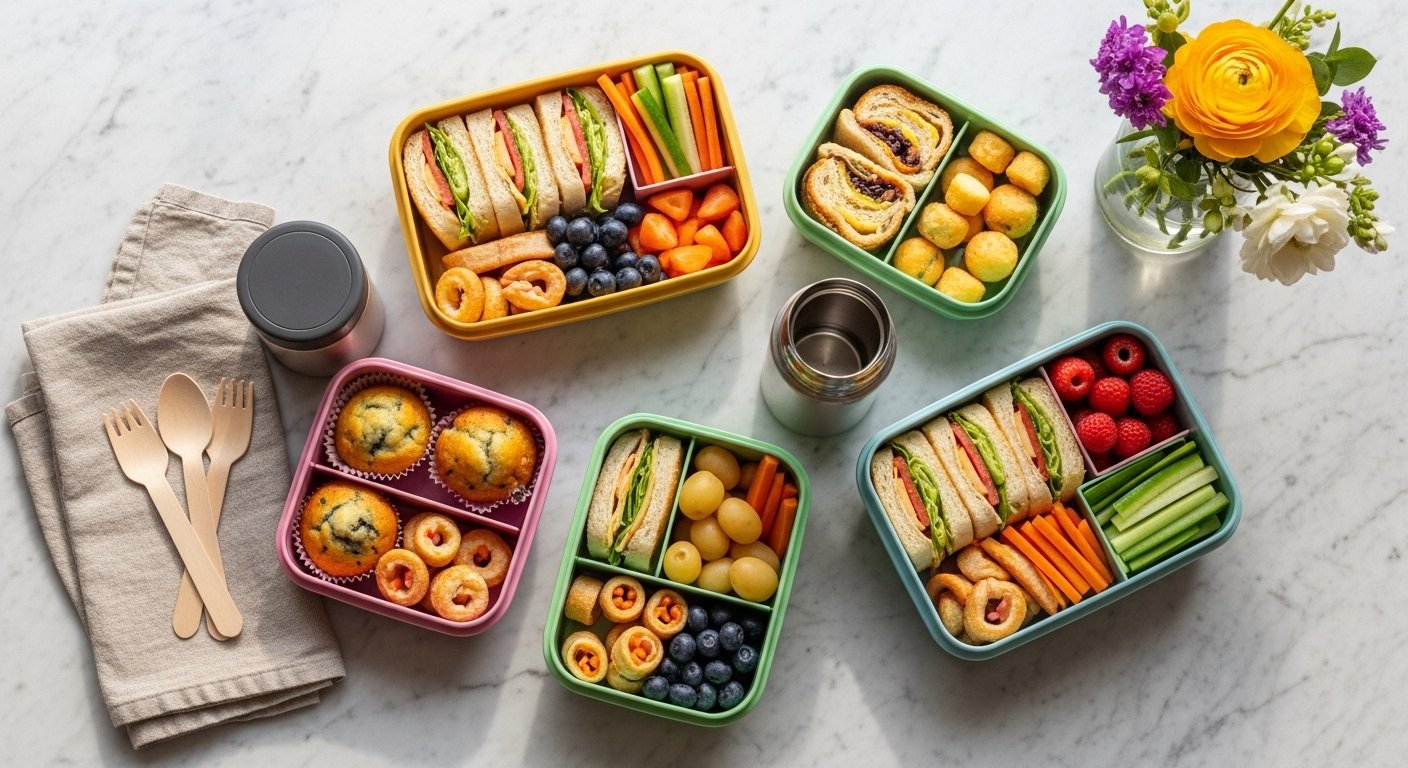
Kids will actually open their lunchboxes when food looks fun, tastes comforting, and is easy to eat. These 12 lunch box ideas deliver exactly that—simple recipes with kid-friendly flavors and smart swaps for picky eaters. You’ll find quick make-ahead mains, veggie-packed sides, and snackable treats that stay fresh until lunchtime.
I often prep a few of these on a Sunday and pack them in glass meal prep containers so everything stays crisp. If you like hands-off cooking, a mini muffin tin speeds up a lot of the mini-bake ideas. Each recipe below includes exact ingredients, step-by-step instructions, and tips to keep the lunch box happy and waste-free—plus helpful product links sprinkled naturally where they actually help.
1. Lunch Box Idea: Mini Turkey Meatloaf Muffins
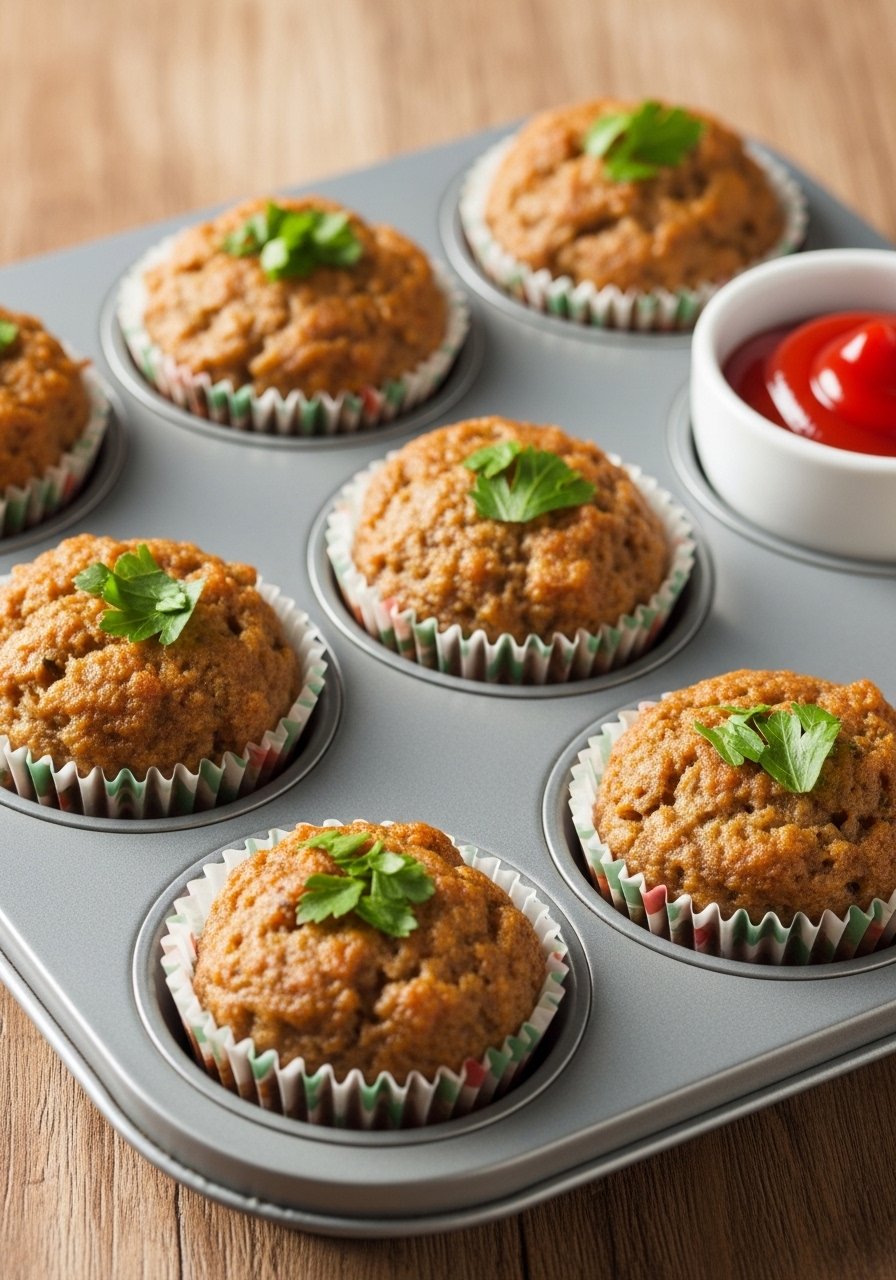
These mini turkey meatloaf muffins are moist, savory, and perfectly portioned for little hands. They combine mild turkey with breadcrumbs, grated veggies, and just enough ketchup-glaze for familiar flavor. The texture is tender—not dense—and they reheat well or eat at room temp, so they’re perfect for school lunches.
I bake these in a non-stick muffin tin and use silicone liners for easy cleanup.
Ingredients
- 1 lb ground turkey
- 1/2 cup plain breadcrumbs
- 1/4 cup milk (whole or 2%)
- 1 large egg, room temperature
- 1/4 cup grated carrot (about 1 small carrot)
- 1/4 cup finely chopped onion
- 1/4 cup grated zucchini, squeezed dry
- 2 tbsp chopped fresh parsley
- 1 tsp garlic powder
- 3/4 tsp salt
- 1/2 tsp black pepper
- 1/3 cup ketchup + 2 tbsp for glaze
- 1 tsp Worcestershire sauce (optional)
Instructions
- Preheat oven to 375°F (190°C). Spray a 12-cup muffin tin or line with silicone liners.
- In a small bowl, soak breadcrumbs in milk for 2 minutes until softened.
- In a large bowl, combine ground turkey, egg, grated vegetables, onion, parsley, garlic powder, salt, pepper, and Worcestershire sauce.
- Add the soaked breadcrumbs and 1/3 cup ketchup. Mix gently with a fork until just combined—don’t overwork the meat.
- Divide mixture evenly into the 12 muffin cups, pressing gently to fill.
- Bake 18–22 minutes, until centers reach 165°F (74°C) on an instant-read thermometer and tops are set.
- Brush each muffin with the remaining 2 tbsp ketchup. Return to oven for 2 minutes to set the glaze.
- Let cool in the pan 5 minutes, then transfer to a wire rack to cool completely.
How to Serve It
Serve one or two muffins with whole-grain crackers and apple slices. Garnish with extra parsley if you like. Pack in glass meal prep containers or a lunch box compartment; they stay moist for up to 3 days in the fridge. Reheat for 30–45 seconds in the microwave if you prefer warm lunches. These freeze well—flash-freeze on a tray, then transfer to airtight containers.
2. Lunch Box Idea: PB&J Roll-Ups with Banana Chips
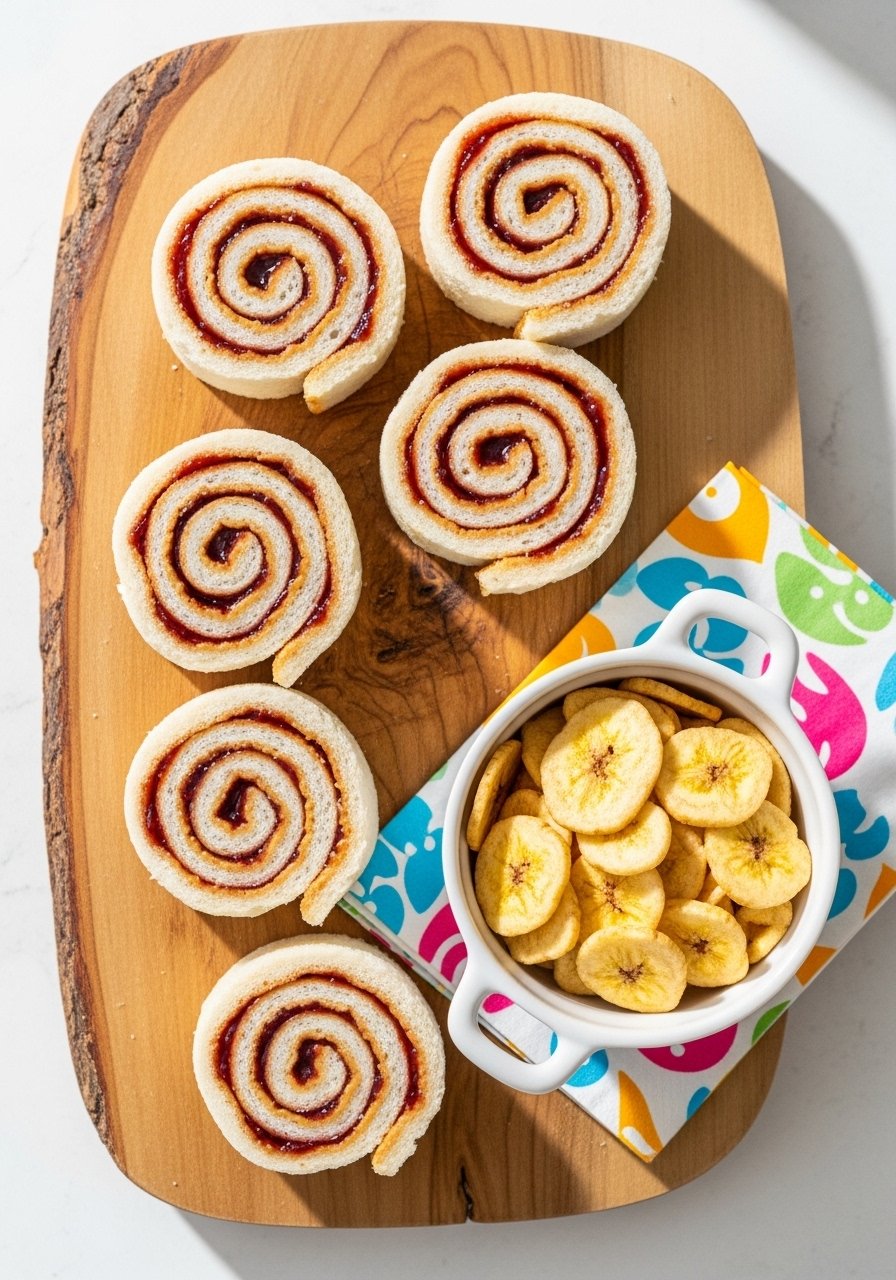
Turn a classic into a fun finger food. These PB&J roll-ups are easy to assemble and less messy than a full sandwich. Adding banana chips gives a crunchy contrast that kids love. Use whole-wheat tortillas for extra fiber and a spreadable nut or seed butter for nut-free schools.
I cut rounds with a cookie cutter set to make uniform pinwheels.
Ingredients
- 4 whole-wheat tortillas (8-inch)
- 1/2 cup peanut butter or sunflower seed butter, room temperature
- 1/2 cup fruit jam or preserves
- 1 small ripe banana, sliced thin (optional)
- 1/4 cup banana chips, crushed
- 2 tbsp honey (optional, for extra stick)
- 2 tbsp softened cream cheese (optional, helps stick)
- 1 tsp cinnamon (optional)
- Fresh berries for garnish (optional)
Instructions
- Lay a tortilla flat on a clean surface.
- Spread about 2 tbsp peanut butter evenly, leaving a 1/2-inch border.
- Spread 1 tbsp jam on top of the peanut butter.
- Sprinkle a light layer of crushed banana chips and a few thin banana slices if using.
- Roll tightly from one edge to the other.
- Slice roll into 6 pinwheels with a sharp knife or cookie cutter.
- Repeat with remaining tortillas.
- Pack pinwheels in a lunch box compartment with extra banana chips on the side to keep them crunchy.
How to Serve It
Pack 4–6 pinwheels with a small container of grapes or carrot sticks. Use a small silicone cup inside the lunch box to separate drier items. If you're shipping to a nut-free school, swap peanut butter for sunflower seed butter and add a note about ingredients. Store in an airtight container in the fridge up to 2 days.
3. Lunch Box Idea: Mini Veggie Frittatas (Make-Ahead)
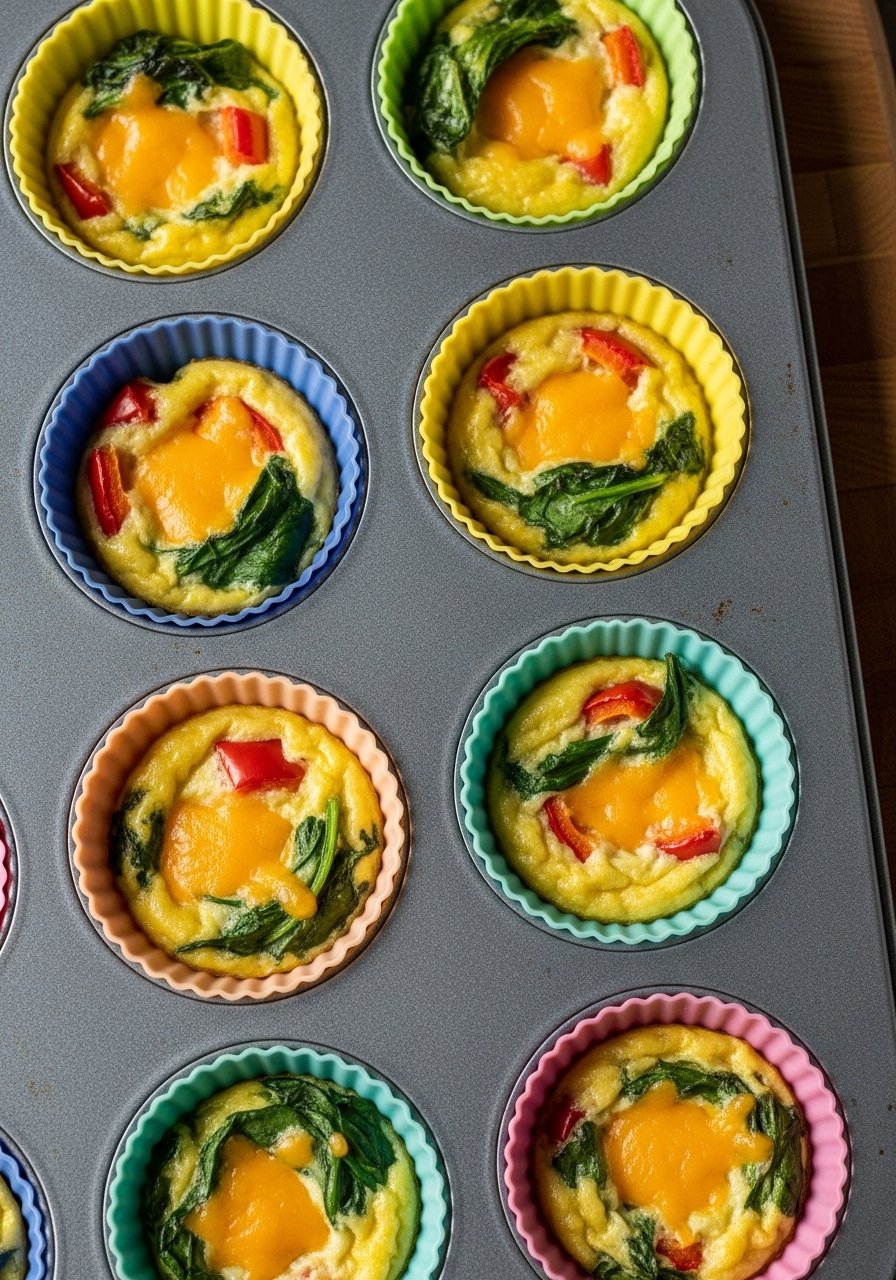
Mini frittatas are protein-packed and great warm or cold. They sneak in veggies without changing flavor too much, and the texture is custardy with slightly crisp edges. Kids who like eggs will adore these, and they're gluten-free by default.
I bake them in a non-stick mini muffin tin with silicone cups for easy release.
Ingredients
- 8 large eggs, room temperature
- 1/2 cup milk or half-and-half
- 1 cup shredded cheddar cheese
- 1/2 cup finely chopped red bell pepper
- 1/2 cup finely chopped spinach, squeezed dry
- 1/4 cup finely chopped onion
- 1/4 cup grated zucchini, squeezed dry
- 1/2 tsp salt
- 1/4 tsp black pepper
- 1/2 tsp dried oregano
- 2 tbsp chopped chives (optional)
- Cooking spray or 1 tbsp olive oil
Instructions
- Preheat oven to 350°F (175°C). Grease a 24-cup mini muffin tin lightly or line with silicone cups.
- Whisk eggs and milk until smooth and slightly frothy.
- Stir in cheese, bell pepper, spinach, onion, zucchini, salt, pepper, oregano, and chives.
- Pour mixture evenly into prepared cups about 3/4 full.
- Bake 14–16 minutes, until centers are set and a toothpick comes out clean.
- Let cool 5 minutes in the pan, then transfer to a rack.
- Store in the fridge in glass meal prep containers up to 4 days.
- Reheat 20–30 seconds in the microwave or enjoy cold.
How to Serve It
Pair two mini frittatas with whole-grain toast fingers and orange slices. Top with a sprinkle of extra cheddar or a tiny dollop of ketchup for dipping. These are portable in a small insulated container or airtight food containers. Make a big batch on Sunday and freeze extras; reheat from frozen for about 1–1.5 minutes in the microwave.
4. Cheesy Quesadilla Pinwheels with Avocado Dip
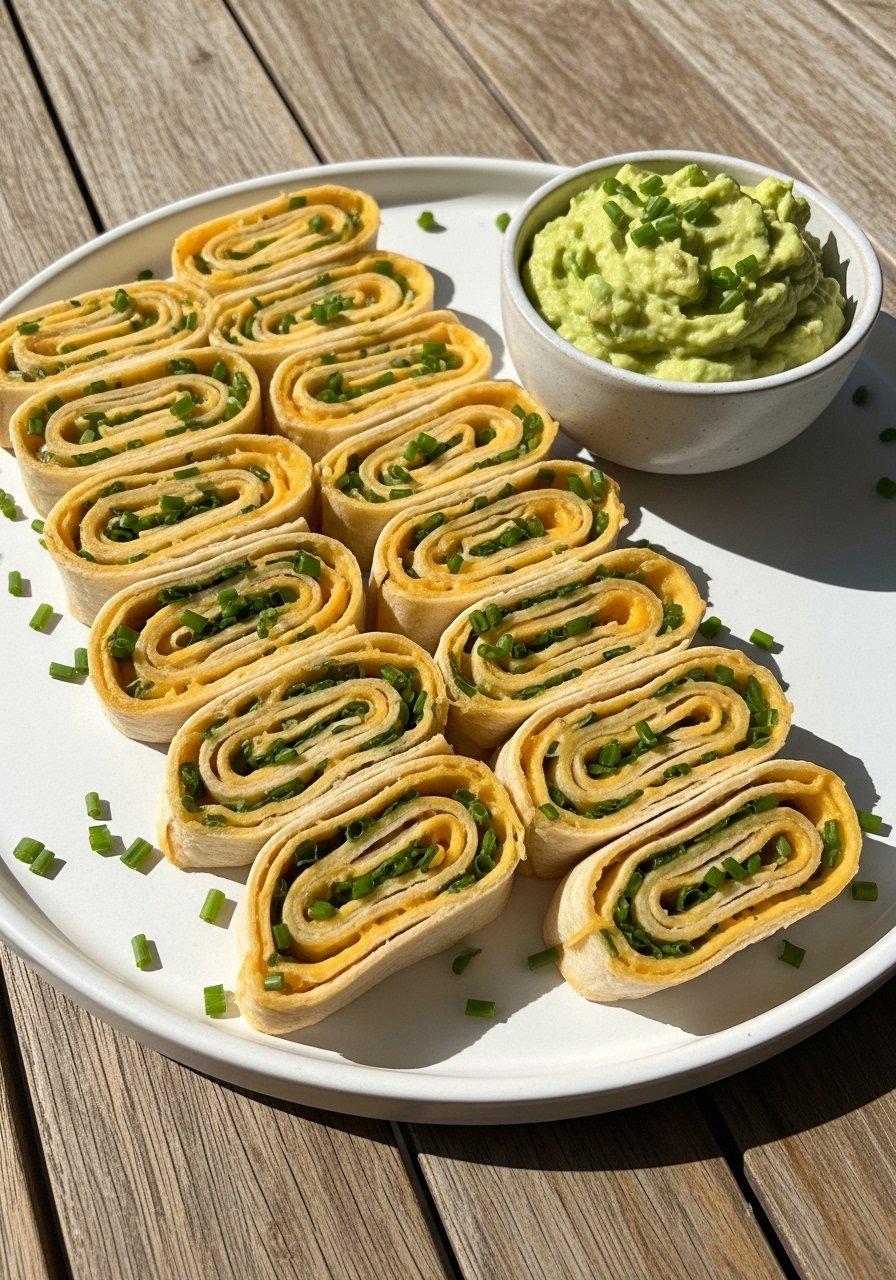
Quesadilla pinwheels are melty and fun to eat. They hold together better than folded quesadillas and are easy to pick up. The avocado dip adds creaminess and healthy fats. Try whole-wheat tortillas and a mild cheddar to keep flavors kid-friendly.
A non-stick skillet makes quick work of melting the cheese before rolling.
Ingredients
- 4 flour or whole-wheat tortillas (8-inch)
- 2 cups shredded mild cheddar or Monterey Jack
- 1/2 cup finely chopped cooked chicken or black beans (optional)
- 1/4 cup finely chopped mild green chilies (optional)
- 1/4 cup chopped fresh cilantro (optional)
- 1 ripe avocado
- 2 tbsp plain Greek yogurt
- 1 tbsp lime juice
- 1/4 tsp salt
- 1/4 tsp cumin
- Butter or oil for skillet
Instructions
- Heat a skillet over medium. Lightly butter one side of a tortilla.
- Place tortilla butter-side-down, sprinkle 1/2 cup cheese evenly, add optional chicken or beans and chilies.
- Cover with another tortilla, press gently, and cook 1–2 minutes per side until cheese melts and both sides are golden.
- Transfer to a cutting board. Using a sharp knife, roll tightly and slice into 8 pinwheels.
- For avocado dip: mash avocado with Greek yogurt, lime juice, salt, and cumin until slightly chunky.
- Repeat with remaining tortillas.
- Let pinwheels cool slightly before packing.
How to Serve It
Pack 4–6 pinwheels with a small container of avocado dip and cucumber slices. Use a small silicone dip cup to prevent spills. Store pinwheels in an airtight container in the fridge and eat within 2 days. Reheat briefly if you want the cheese gooey again.
5. Chicken Salad Wraps with Grapes and Crunch
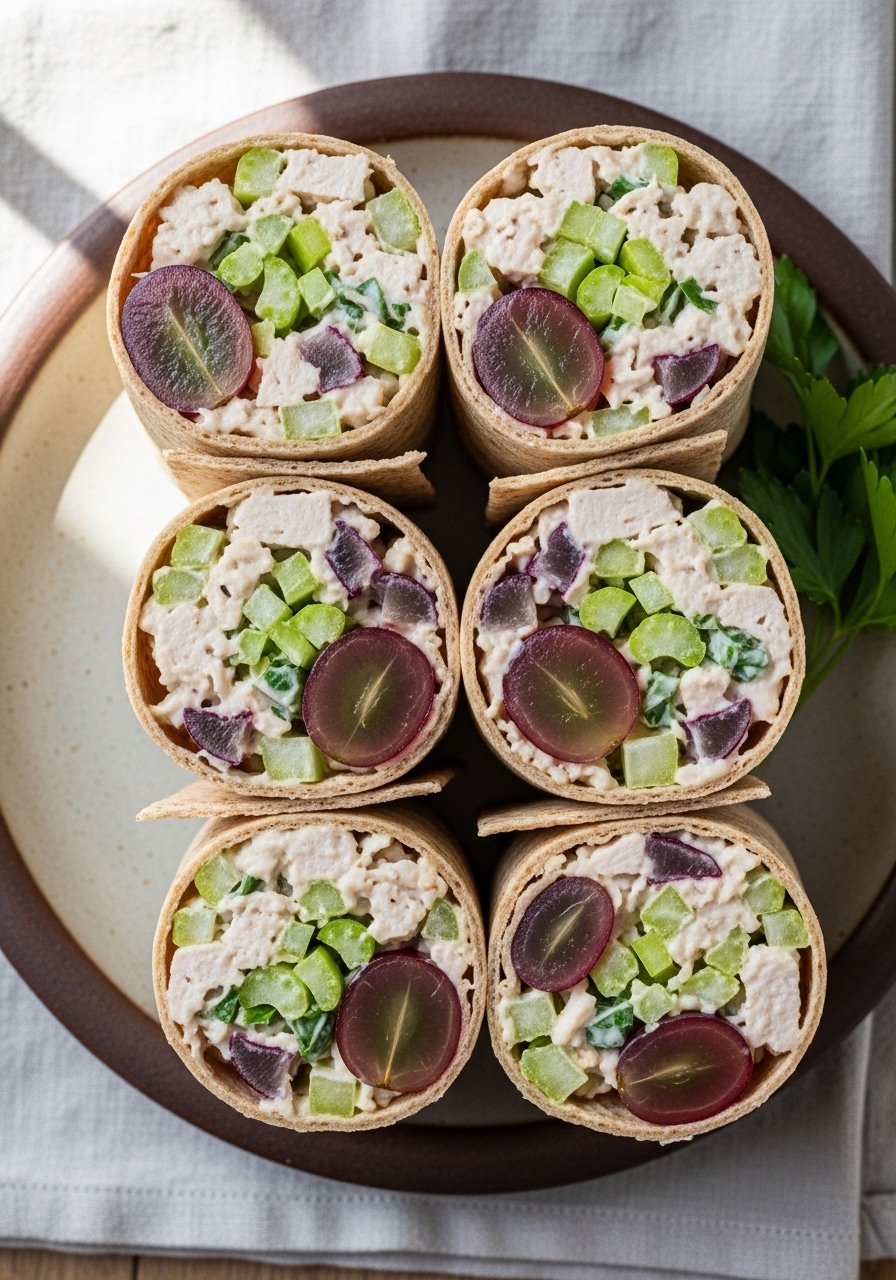
This chicken salad is creamy with sweet pops of grapes and a satisfying crunch from celery and almonds. It’s lighter than mayo-heavy versions thanks to Greek yogurt and lemon. The wrap format keeps it portable and less crumbly than a sandwich.
I shred chicken quickly using a hand mixer or two forks for effortless shredding.
Ingredients
- 2 cups cooked shredded chicken (rotisserie works)
- 1/3 cup plain Greek yogurt
- 2 tbsp light mayonnaise
- 1 tbsp lemon juice
- 1/4 cup chopped celery
- 1/3 cup seedless red grapes, halved
- 1/4 cup sliced almonds, toasted
- 1/4 cup chopped green onion
- 1 tsp Dijon mustard
- 1/2 tsp salt
- 1/4 tsp black pepper
- 4 whole-grain tortillas or wraps
- Lettuce leaves for extra crunch (optional)
Instructions
- In a large bowl, whisk Greek yogurt, mayo, lemon juice, Dijon, salt, and pepper.
- Add shredded chicken, celery, grapes, green onion, and toasted almonds.
- Toss gently to coat without crushing grapes.
- Lay out a tortilla, place lettuce if using, then scoop about 3/4 cup chicken salad down the center.
- Fold sides and roll tightly. Slice in half on the diagonal.
- Repeat with remaining tortillas.
- Wrap tightly in plastic wrap or pack in a glass meal prep container.
How to Serve It
Serve a half-wrap with snap peas and a small fruit cup. Wraps hold well for 4–6 hours in an insulated lunch bag with a small ice pack. Store leftovers in an airtight container and use within 2 days. If your child prefers less mix-ins, pack grapes separately to prevent sogginess.
6. Hummus & Pita Dippers with Veggie "Fries"
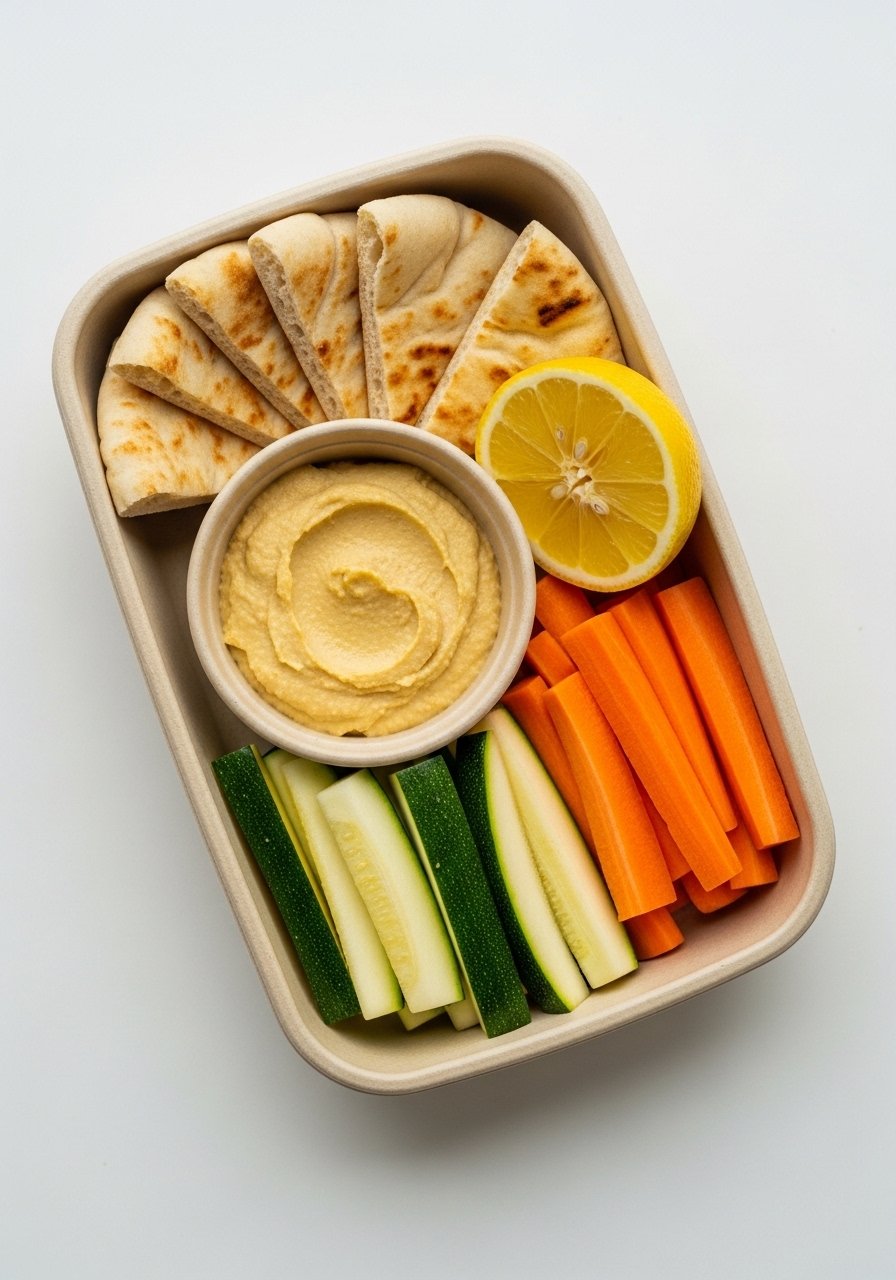
Hummus dippers are vegetarian, tasty, and great for kids who like dipping. Homemade or store-bought hummus works; add roasted red peppers for variety. Veggie "fries"—carrot, cucumber, and zucchini—are crisp and colorful, making the whole box more tempting.
A food processor makes silky hummus in minutes.
Ingredients
- 1 can (15 oz) chickpeas, drained and rinsed
- 1/4 cup tahini
- 3 tbsp fresh lemon juice
- 2 tbsp olive oil, plus extra for drizzling
- 1 small garlic clove
- 1/2 tsp ground cumin
- 1/2 tsp salt
- 2–3 tbsp water (as needed)
- 1/2 cup roasted red peppers (optional)
- 2 whole pita breads, quartered
- 2 carrots, cut into sticks
- 1 small cucumber, cut into sticks
- 1 small zucchini, cut into sticks
- Paprika for garnish
Instructions
- In a food processor, combine chickpeas, tahini, lemon juice, olive oil, garlic, cumin, and salt.
- Process until smooth, adding water 1 tbsp at a time until desired consistency.
- Stir in roasted red peppers if using and pulse a few times.
- Taste and adjust lemon or salt.
- Cut pita into triangles and lightly toast in a toaster oven or skillet for 1–2 minutes for crispness.
- Arrange hummus in a small container, drizzle with olive oil and sprinkle paprika.
- Pack pita and veggie sticks separately to keep them crunchy.
How to Serve It
Serve with a lemon wedge and a small sprinkle of za’atar if you like. Pack hummus in a leak-proof container and vegetables in a separate compartment. Use silicone food cups inside lunch boxes to keep items from touching. Hummus keeps 4–5 days refrigerated.
7. Turkey & Veggie Pinwheels (Kid-Friendly Veg Boost)
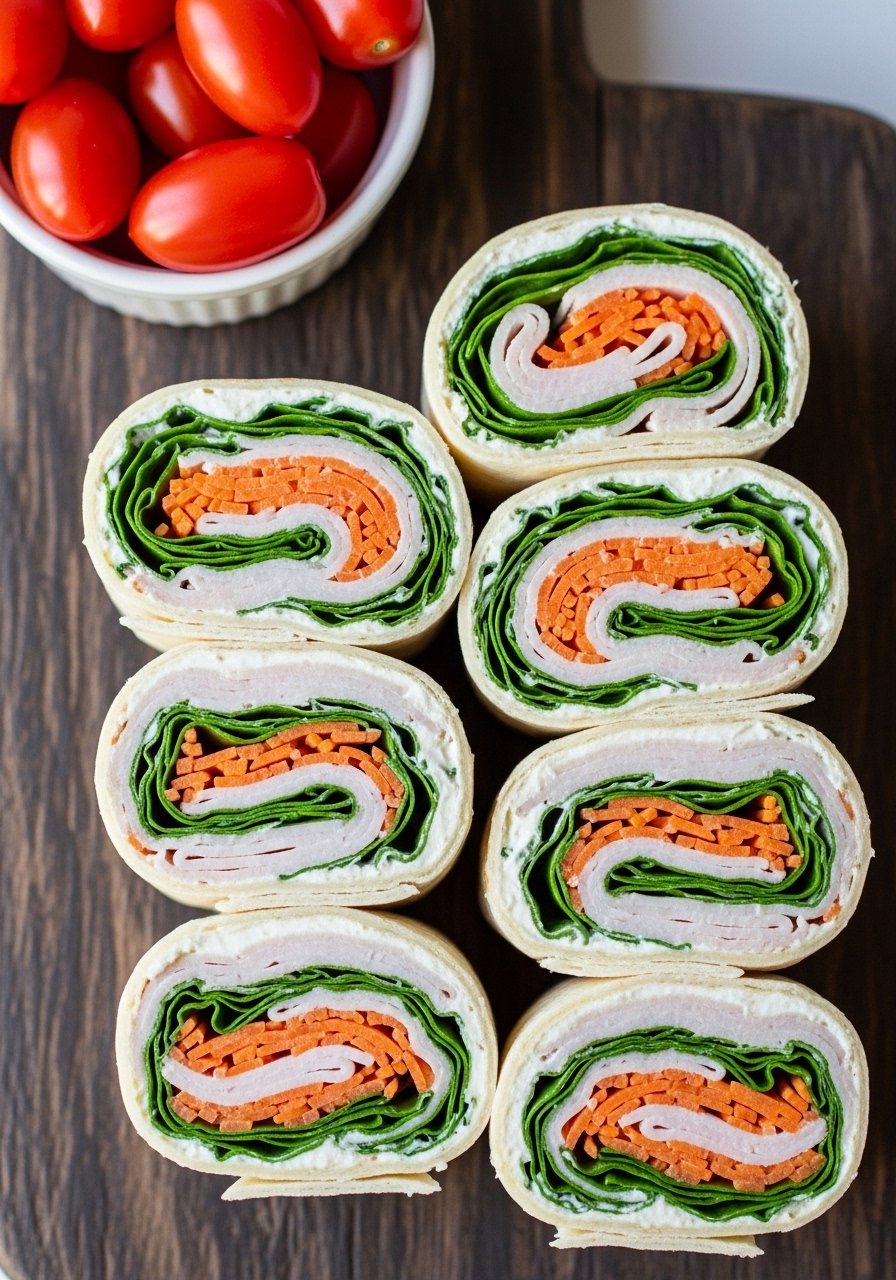
These pinwheels hide veggies inside cream cheese, turkey, and grated carrot—great for kids who resist visible greens. They’re soft, easy to hold, and you can change fillings to keep things interesting. They’re best made the same day for soft tortillas or the night before for easier slicing.
A bench scraper helps cut clean, even slices.
Ingredients
- 4 large flour tortillas (10-inch)
- 8 oz cream cheese, softened
- 1 tbsp honey or maple syrup
- 1 tsp Dijon mustard
- 8 slices deli turkey
- 1 cup finely shredded carrot
- 1 cup baby spinach, very finely chopped
- 1/2 cup thinly sliced cucumber, seeds removed
- 1/4 tsp salt
- 1/4 tsp black pepper
- Optional: sliced cheddar for extra flavor
Instructions
- In a bowl, beat cream cheese with honey and Dijon until smooth.
- Spread about 3 tbsp of cream cheese mixture over each tortilla, leaving a 1/2-inch border.
- Layer turkey, shredded carrot, chopped spinach, and cucumber evenly.
- Roll tightly from one edge and wrap in plastic wrap.
- Chill for 30 minutes to firm up for cleaner slices.
- Unwrap and slice into 8 pinwheels using a sharp knife or bench scraper.
- Pack gently in a container to prevent squashing.
How to Serve It
Pair two turkey pinwheels with a small side of ranch or yogurt dip and sliced apples. Keep chilled with an ice pack inside the lunch bag. These hold up for a school day and are great for picky eaters who prefer familiar flavors.
8. Tuna-Stuffed Mini Peppers with Cornbread Muffin
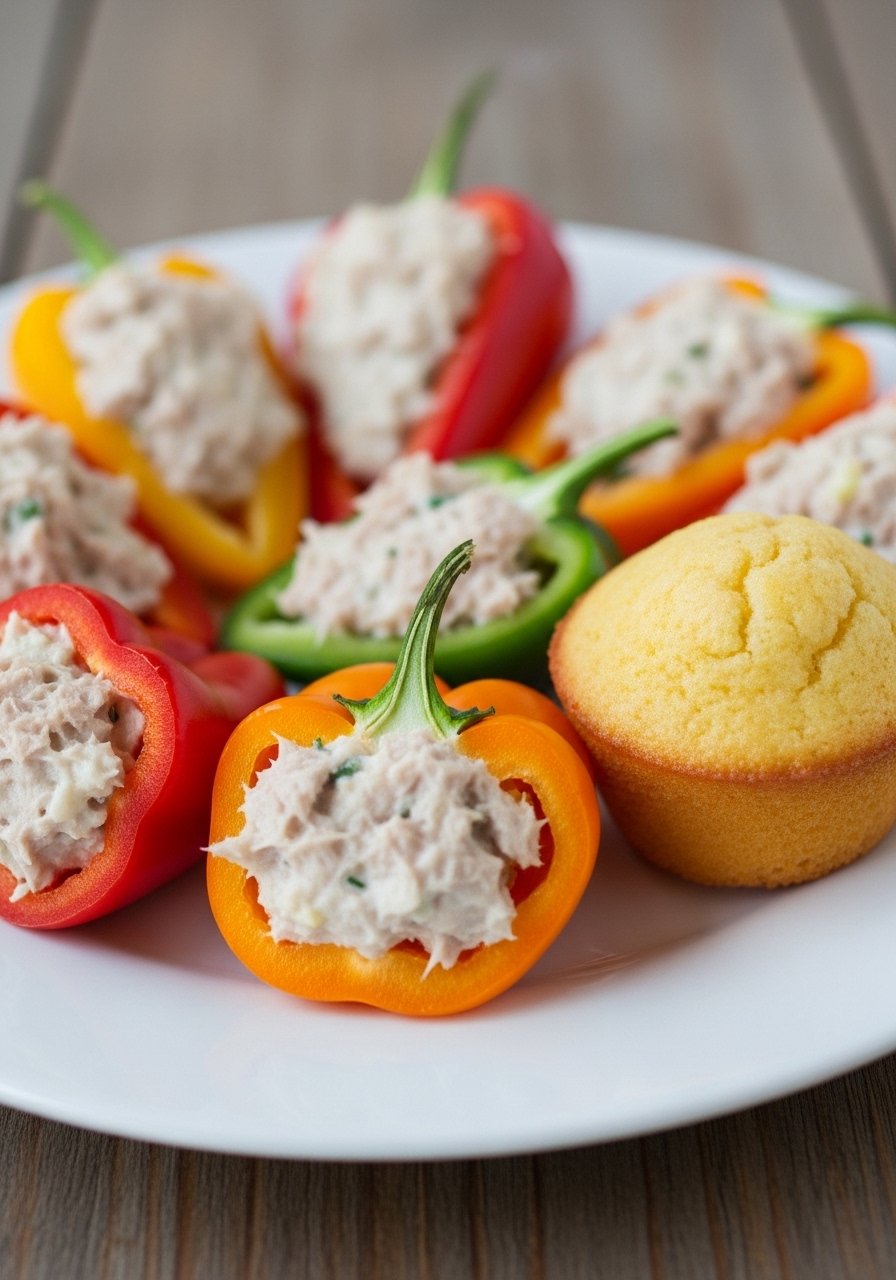
Mini peppers are colorful, crunchy, and the perfect vehicle for tuna salad. This version uses Greek yogurt and lemon for bright flavor. Add a small cornbread muffin for carbs—sweet enough to appeal to kids.
I bake muffins in a mini muffin tin lined with paper cups.
Ingredients
- 10–12 mini sweet peppers, halved and seeded
- 1 can (5 oz) tuna in water, drained
- 1/4 cup plain Greek yogurt
- 1 tbsp light mayo (optional)
- 1 tsp lemon juice
- 1 tbsp finely chopped celery
- 1 tbsp finely chopped red onion
- 1 tbsp chopped fresh dill or parsley
- 1/4 tsp salt
- 1/8 tsp black pepper
- Mini cornbread muffins: use a favorite mix or:
- 1 cup cornmeal
- 1 cup flour
- 1/4 cup sugar
- 1 tbsp baking powder
- 1/2 tsp salt
- 1 cup milk
- 1 egg
- 2 tbsp melted butter
Instructions
- For tuna filling: mix tuna, Greek yogurt, mayo, lemon juice, celery, onion, dill, salt, and pepper until combined.
- Spoon tuna into mini pepper halves and chill.
- Preheat oven to 400°F (200°C) for muffins.
- For muffins: whisk dry ingredients, then add milk, egg, and melted butter. Stir until combined.
- Divide batter into a greased or lined mini muffin tin.
- Bake 10–12 minutes until golden and a toothpick comes out clean.
- Cool muffins on a wire rack.
How to Serve It
Pack 3–4 stuffed peppers with a mini cornbread muffin and sliced pear. Keep tuna chilled in an airtight container until packing. Muffins can be made ahead and frozen; thaw in the fridge overnight.
9. Greek Yogurt Parfait Jar with Granola & Honey

Parfaits are customizable, portable, and loved by kids who enjoy spoonable foods. Layer Greek yogurt with fruit compote and granola for texture. Keep the granola separate until lunchtime to avoid sogginess.
A set of mason jars or small glass jars makes packing neat.
Ingredients
- 2 cups plain Greek yogurt
- 1 cup mixed berries (fresh or frozen, thawed)
- 2 tbsp honey or maple syrup
- 1 tsp lemon zest
- 1 cup granola
- 1/4 cup chia seeds (optional)
- 1/2 tsp vanilla extract
- 1/4 cup sliced almonds (optional)
- Optional mix-ins: chocolate chips, shredded coconut
Instructions
- In a saucepan, cook berries with 1 tbsp honey over low heat for 5–7 minutes until slightly jammy. Stir in lemon zest and cool.
- Stir vanilla extract and remaining 1 tbsp honey into Greek yogurt.
- Spoon 2 tbsp yogurt into the bottom of each jar, then 1 tbsp berry compote, then a layer of yogurt. Repeat to fill jars leaving room at top for granola.
- Pack granola separately in a small bag or container to add at lunchtime.
- Seal jars and refrigerate up to 3 days.
How to Serve It
Let kids assemble at lunch by adding granola and almonds on top for crunch. Use mason jars or glass food storage jars with lids. For nut-free schools, swap almonds for sunflower seeds. Parfaits travel well with an ice pack.
10. BBQ Chicken Sliders with Coleslaw
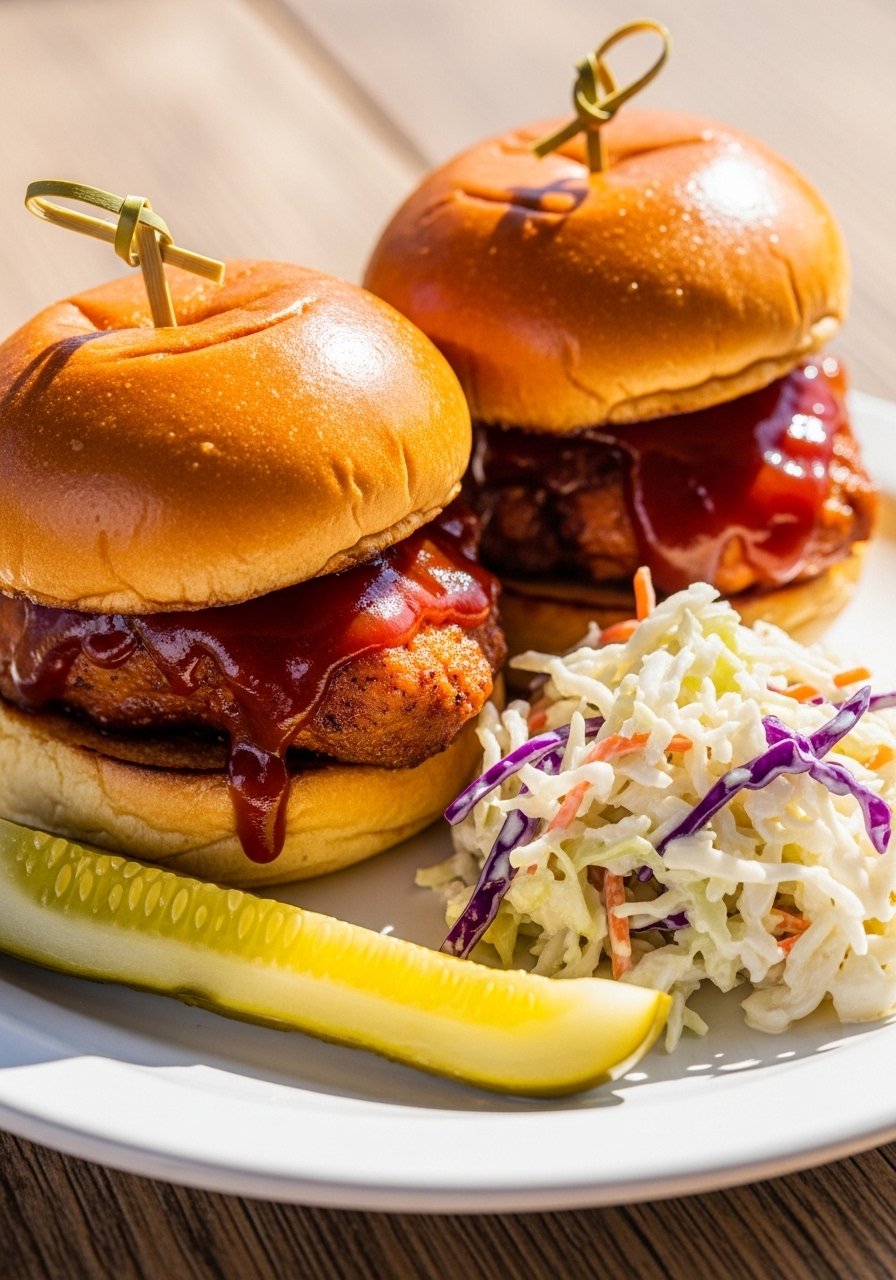
These BBQ chicken sliders are sweet, tangy, and perfectly sized for lunch boxes. Use shredded rotisserie chicken with a simple homemade BBQ sauce. The slaw adds crisp texture and helps cut the sweetness.
A slow cooker is an easy way to make shredded chicken if you want hands-off prep.
Ingredients
- 2 cups cooked shredded chicken
- 3/4 cup barbecue sauce (store-bought or homemade)
- 8 mini slider buns
- 1 cup shredded cabbage
- 1/4 cup shredded carrot
- 2 tbsp plain Greek yogurt or mayo
- 1 tbsp apple cider vinegar
- 1 tsp honey
- 1/4 tsp salt
- 1/4 tsp black pepper
- 1 tbsp chopped chives (optional)
Instructions
- Combine shredded chicken and 3/4 cup barbecue sauce in a saucepan. Heat over medium, stirring, until warmed 4–6 minutes. If using a slow cooker, combine and cook on low 2–3 hours.
- For slaw: toss cabbage, carrot, Greek yogurt, apple cider vinegar, honey, salt, pepper, and chives.
- Toast slider buns briefly in the oven or skillet if desired.
- Pile about 1/4 cup BBQ chicken on each bun and top with a spoonful of slaw.
- Wrap sliders individually in parchment or foil to keep warm.
How to Serve It
Pack one or two sliders with a side of grapes and baked sweet potato chips. Use a small insulated lunch box or airtight container. Sliders keep well for several hours and reheat quickly if needed.
11. Veggie-Packed Pasta Salad (Kid-Tested)
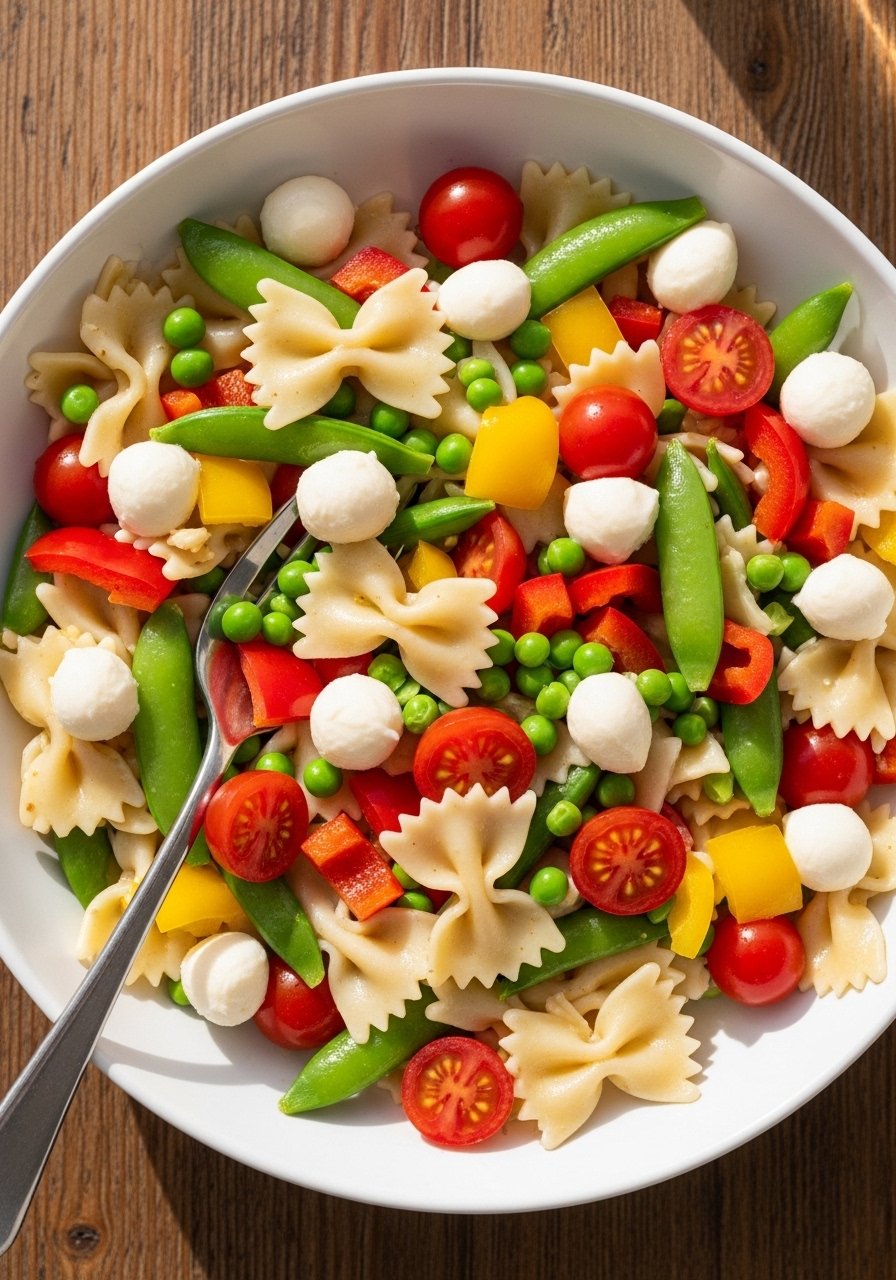
This pasta salad packs vegetables into a mild, creamy dressing kids enjoy. It’s ideal for warm days and transports well. Use small pasta shapes like rotini or bowtie to trap dressing and mix-ins.
A colander and measuring cups help with quick prep.
Ingredients
- 8 oz small pasta (rotini, bowtie, or shells)
- 1/2 cup frozen peas, thawed
- 1/2 cup cherry tomatoes, quartered
- 1/2 cup diced cucumber, seeds removed
- 1/2 cup diced bell pepper
- 1/2 cup cubed mozzarella or shredded cheddar
- 1/3 cup plain Greek yogurt
- 1/4 cup mayo or more Greek yogurt
- 2 tbsp lemon juice
- 1 tbsp olive oil
- 1 tsp honey
- 1/2 tsp dried basil
- Salt and pepper to taste
Instructions
- Cook pasta according to package directions until al dente. Drain and rinse under cold water to stop cooking.
- In a large bowl, whisk Greek yogurt, mayo, lemon juice, olive oil, honey, basil, salt, and pepper.
- Toss pasta with dressing, peas, tomatoes, cucumber, bell pepper, and cheese.
- Chill at least 30 minutes for flavors to meld.
- Taste and adjust seasoning before packing.
- Store in the fridge in an airtight container up to 3 days.
How to Serve It
Portion pasta salad into small containers and top with a sprinkle of extra cheese or fresh herbs. Add a side of melon cubes and a small ice pack. For gluten-free, use a gluten-free pasta and follow the same steps.
12. Sushi-Style Cucumber & Avocado Rolls (No Rice)
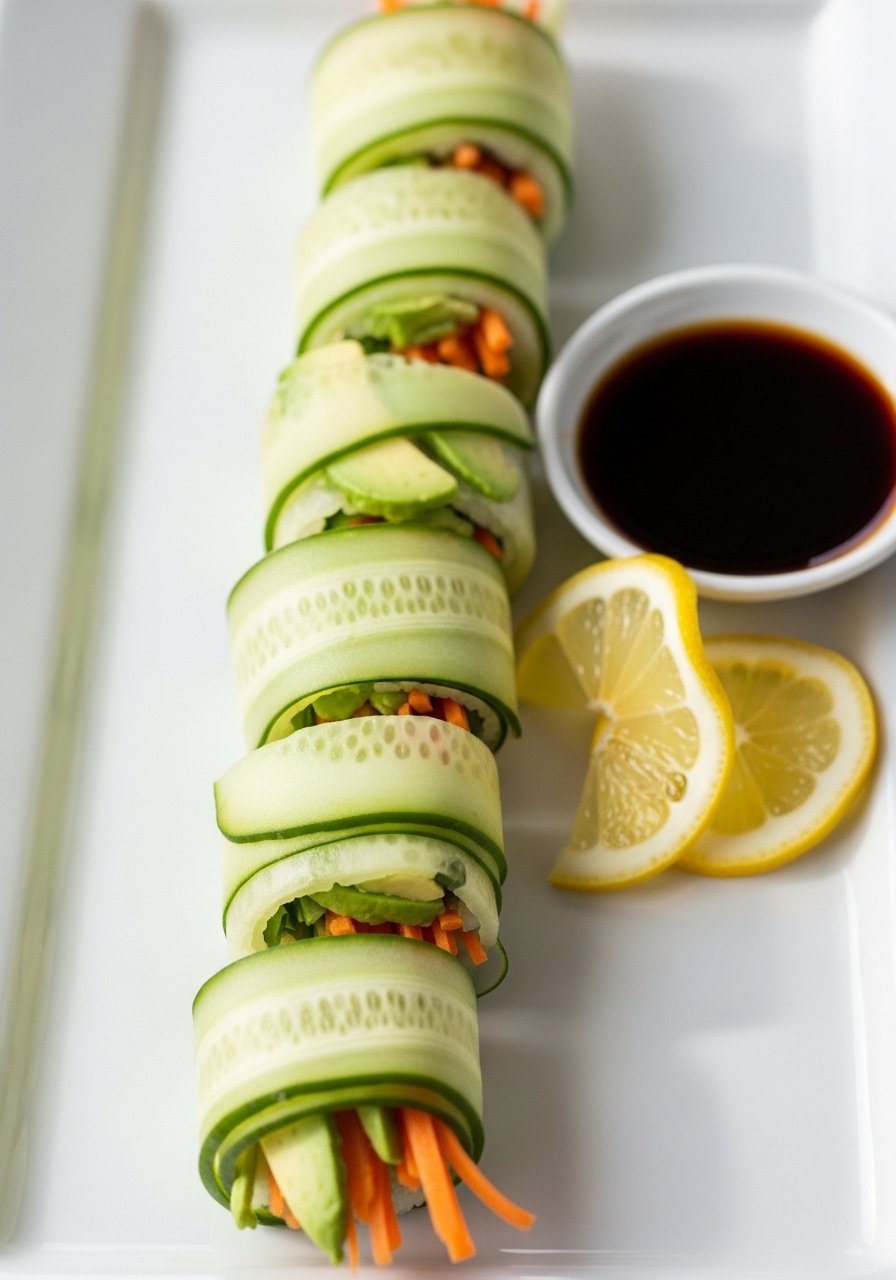
If your child is into sushi flavors but you want a low-carb, easy version, these cucumber rolls are crisp and fresh. They offer finger-food fun without raw fish or messy rice. Kids often enjoy the crunch and creamy avocado.
A sharp chef’s knife and a mandoline slicer make quick work of thin cucumber ribbons.
Ingredients
- 2 large English cucumbers
- 1 ripe avocado, thinly sliced
- 1 medium carrot, cut into matchsticks
- 1/2 red bell pepper, thinly sliced
- 2 tbsp hummus or cream cheese (for spread)
- 1 tbsp soy sauce or tamari (optional)
- 1 tsp rice vinegar (optional)
- 1 tsp sesame seeds
- 1 tbsp chopped chives or green onion
- Salt and pepper to taste
- Optional dip: soy sauce mixed with a splash of rice vinegar
Instructions
- Slice cucumbers lengthwise into thin ribbons using a mandoline or a sharp knife. Pat ribbons dry with a paper towel to remove excess moisture.
- Lay a cucumber ribbon flat and spread a thin layer of hummus or cream cheese.
- Place a slice of avocado, a few carrot matchsticks, and a strip of bell pepper at one end.
- Roll tightly and secure with a toothpick if needed.
- Repeat until all ribbons are used.
- Arrange rolls on a plate and sprinkle with sesame seeds and chives.
- Pack rolls in a shallow container so they don't get crushed.
How to Serve It
Serve with a tiny container of soy dipping sauce. These are best eaten the same day they’re made. Keep avocado from browning by topping with a tiny squeeze of lemon and packing tightly in an airtight container. Great for kids who like fresh, crisp textures.
Kids need variety, and these 12 lunch box ideas give you options from savory to sweet, warm to chilled, and fun to familiar. Try prepping a few recipes each weekend so you have grab-and-go options midweek. If you often make several of these, a set of glass meal prep containers and an insulated lunch bag will simplify packing and keep food fresh.
Which of these lunch box ideas will you try first? Save or pin this for later, and share with a friend who’s always asking for new kid-friendly lunches. Trust me, a good silicone baking mat set and some airtight food containers make meal-prep days so much easier—and less messy.