
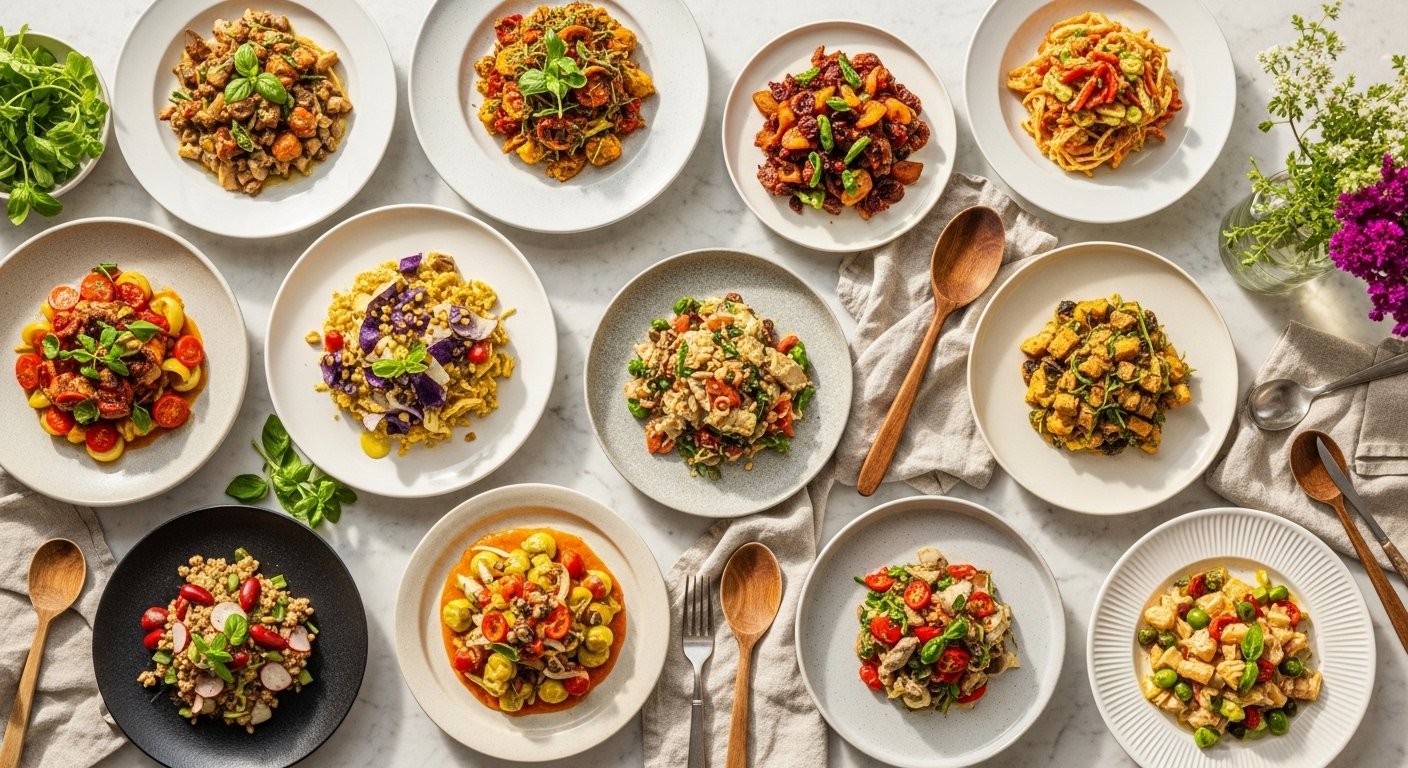
You want reliable, tasty recipes that actually work the first time — and that’s exactly what these beginner recipes deliver. Whether you’re new to the stove, easing into baking, or cooking for family weeknights, this list covers simple techniques, clear timing, and fail-proof flavor combos.
Inside you’ll find breakfast, dinner, snacks, and baked treats with exact measurements, oven temps, and step-by-step instructions. I mention handy tools as you need them — like my KitchenAid stand mixer for batters and a cast iron skillet for crispy sears — so you’ll have what helps the recipes succeed. These beginner recipes are forgiving, delicious, and designed to build confidence fast. Grab a mug, pin this for later, and let’s get cooking.
1. Fluffy Classic Pancakes (Beginner Recipes Favorite)

These pancakes are light, tender, and forgiving — great for weekend mornings or quick breakfasts. They have a slightly sweet, buttery flavor and airy texture that holds syrup and fruit well. If you like a slightly crisp edge, a hot non-stick pan helps. Kids and busy adults love them, and they’re one of the easiest beginner recipes for mastering heat control.
Ingredients
- 1 1/2 cups all-purpose flour
- 3 1/2 tsp baking powder
- 1 tbsp granulated sugar
- 1/2 tsp salt
- 1 1/4 cups whole milk
- 1 large egg, room temperature
- 3 tbsp unsalted butter, melted + extra for pan
- 1 tsp vanilla extract
- 1/2 cup fresh blueberries (optional)
- Maple syrup, for serving
Instructions
- Whisk dry ingredients: in a bowl combine 1 1/2 cups flour, 3 1/2 tsp baking powder, 1 tbsp sugar, and 1/2 tsp salt.
- Mix wet: in a separate bowl whisk 1 1/4 cups milk, 1 egg, 3 tbsp melted butter, and 1 tsp vanilla until smooth.
- Combine: pour wet into dry and stir until just combined; lumps are okay. Rest batter 5 minutes.
- Heat pan: preheat a non-stick skillet or griddle over medium heat for 3 minutes. A non-stick skillet works great to prevent sticking.
- Cook pancakes: brush pan with a little butter. Pour 1/4 cup batter per pancake. If using blueberries, sprinkle onto top before flipping.
- Flip when bubbly: cook 2–3 minutes until bubbles form and edges look set, flip, then cook 1–2 minutes until golden.
- Keep warm: transfer to a plate and loosely tent with foil while finishing batch.
- Serve: plate stacks, add butter and maple syrup.
How to Serve It
Serve hot with fresh fruit and a drizzle of pure maple syrup. For a brunch display, stack on a white cake stand. Leftovers keep in an airtight container in the fridge up to 3 days and reheat in a toaster or oven at 350°F for 5–7 minutes.
2. Creamy Scrambled Eggs with Herbs

Soft, creamy scrambled eggs depend on gentle heat and patience rather than fancy technique. They’re fluffy with a silky mouthfeel and bright herb notes. This recipe is a quick confidence-builder for anyone starting out in the kitchen.
Ingredients
- 4 large eggs, room temperature
- 2 tbsp whole milk or cream
- 1 tbsp unsalted butter
- Salt and black pepper, to taste
- 1 tbsp chopped chives
- 1 tbsp chopped flat-leaf parsley
- 1/4 tsp garlic powder (optional)
- 1 tsp olive oil (for toast)
- 2 slices sourdough bread, for serving
- Hot sauce or sliced avocado, optional
Instructions
- Crack eggs into a bowl and whisk with 2 tbsp milk, salt and pepper until blended.
- Heat pan: warm a medium non-stick or cast iron skillet over low heat for 1 minute. I use my Lodge cast iron skillet for even heat.
- Melt butter: add 1 tbsp butter to the pan and let it foam gently.
- Cook slowly: pour eggs in and let sit 10–15 seconds. Using a silicone spatula, gently push the egg from edges to center repeatedly.
- Remove before fully set: when large, soft curds form but eggs still glisten, remove from heat; carryover will finish cooking.
- Fold in herbs: stir in chives and parsley and season to taste.
- Toast bread: meanwhile, toast sourdough brushed with 1 tsp olive oil.
- Plate and serve immediately.
How to Serve It
Spoon eggs onto toast and top with extra herbs and sliced avocado. For serving, a set of wooden serving boards looks rustic. Store leftovers in an airtight container and eat within 24 hours — reheat gently to avoid rubbery texture.
3. Oven-Roasted Lemon Chicken Thighs
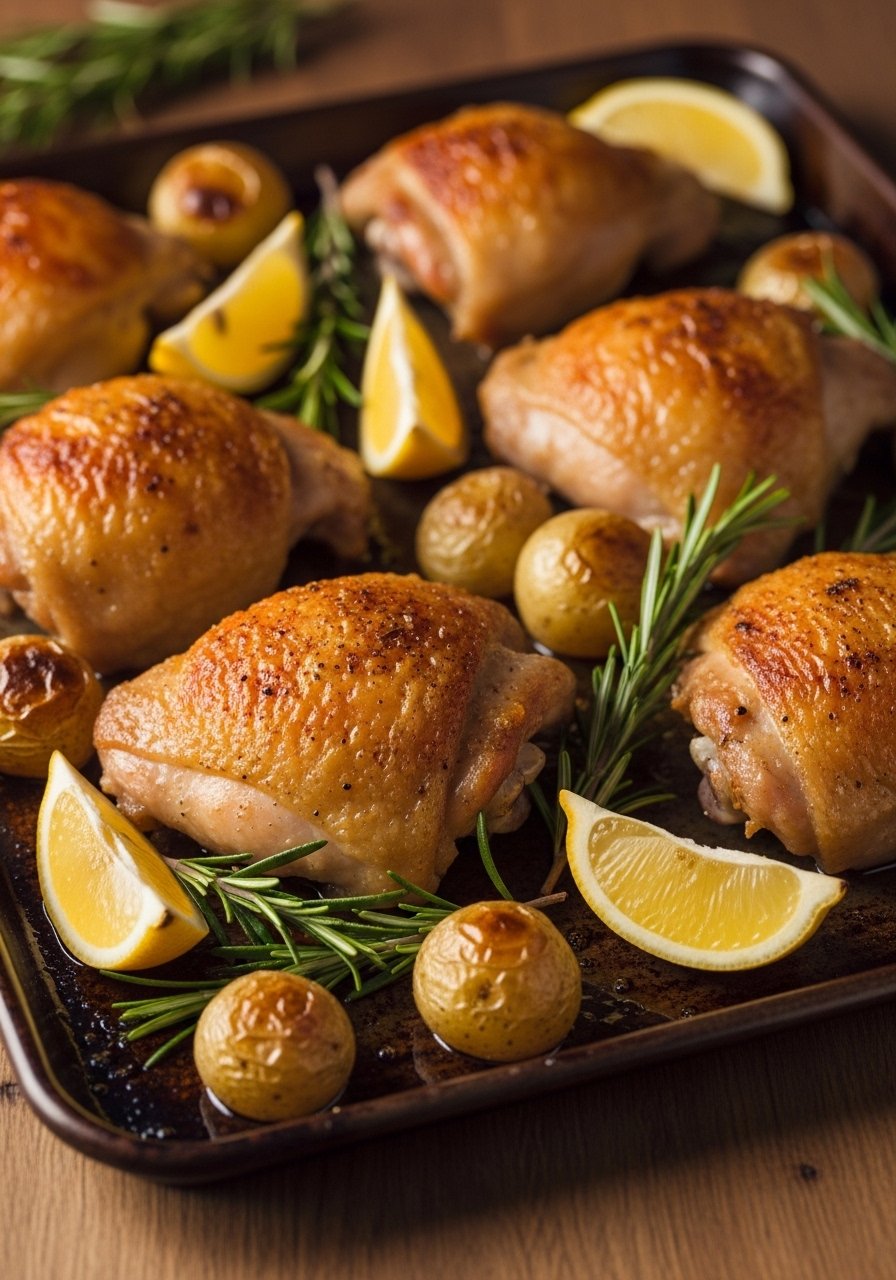
Roasting bone-in chicken thighs gives you juicy meat and crisp skin with minimal hands-on time. The lemon and rosemary brighten the savory notes. This recipe is forgiving with timing, a great addition to your beginner recipes arsenal for weeknight dinners.
Ingredients
- 6 bone-in, skin-on chicken thighs (about 3 lbs)
- 2 tbsp olive oil
- 1 tbsp lemon zest
- 2 tbsp fresh lemon juice
- 4 cloves garlic, minced
- 2 tsp kosher salt
- 1 tsp black pepper
- 1 tbsp chopped fresh rosemary
- 1 lb baby potatoes, halved
- 1/2 lb baby carrots
- 1 tsp smoked paprika
Instructions
- Preheat oven to 425°F (220°C) and line a baking sheet with parchment paper or use a roasting pan.
- Pat chicken dry with paper towels — dry skin crisps better.
- Mix marinade: in a bowl combine 2 tbsp olive oil, lemon zest, lemon juice, 4 minced garlic, salt, pepper, and rosemary.
- Toss veggies: in a large bowl toss potatoes, carrots, and 1 tsp smoked paprika with a pinch of salt and 1 tbsp olive oil.
- Arrange: place chicken skin-side up on the pan, nestle veggies around. Spoon marinade evenly over thighs.
- Roast: bake 35–40 minutes until chicken reaches 165°F internal temp (check with an instant-read thermometer) and skin is golden.
- Broil if needed: for ultra-crisp skin, broil 2–3 minutes keeping a close eye.
- Rest 5 minutes before serving.
How to Serve It
Serve with roasted vegetables and a green salad. Garnish with extra lemon wedges and rosemary. Store leftovers in glass meal prep containers in the fridge for up to 3 days. Reheat gently in a 350°F oven to keep skin texture.
4. One-Pot Garlic Butter Shrimp Pasta (Beginner Recipes Pasta Night)
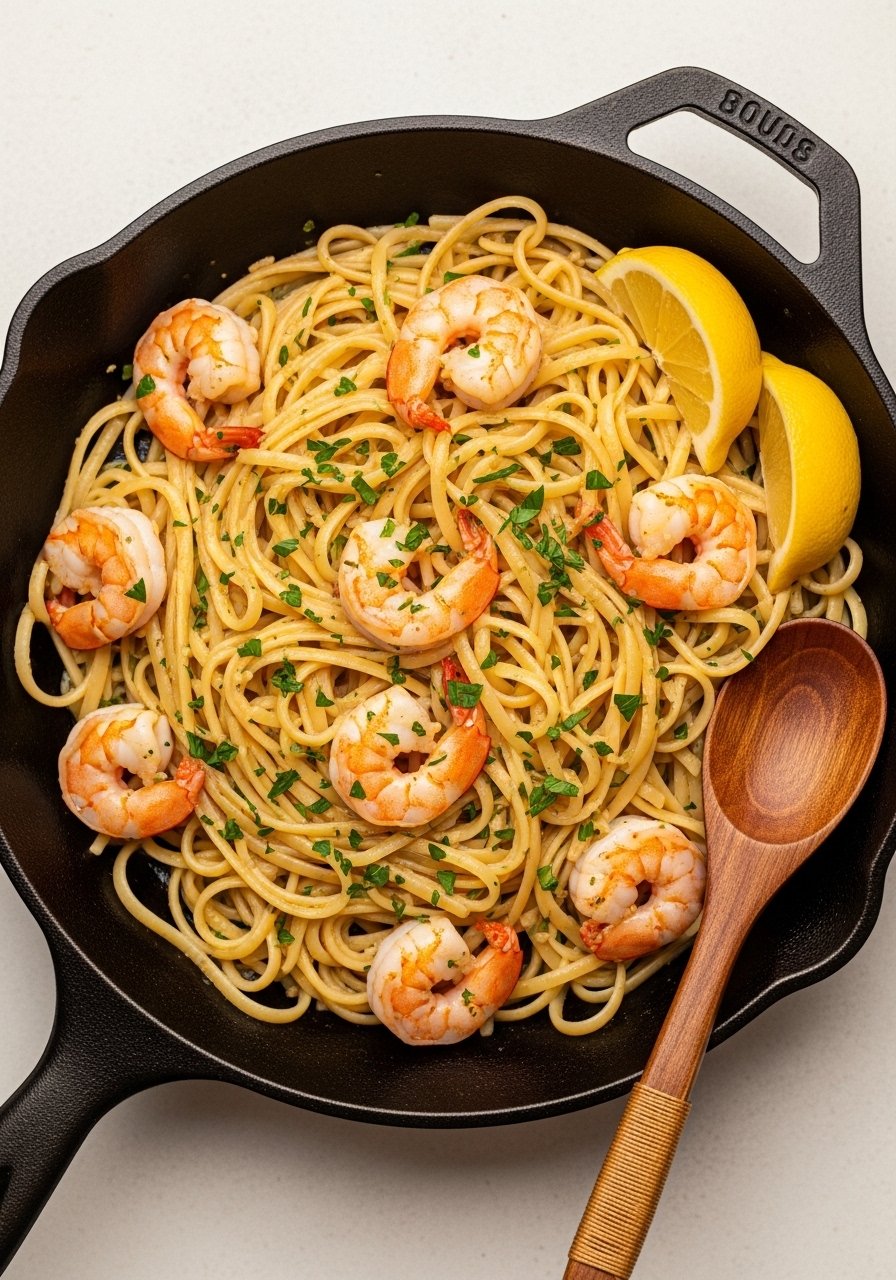
This one-pot pasta keeps cleanup minimal and flavor high — garlicky, buttery sauce clings to every strand. Shrimp cooks quickly and stays tender. It's one of those beginner recipes that teaches timing and how to finish pasta in a sauce.
Ingredients
- 8 oz linguine or spaghetti
- 12 oz large shrimp, peeled and deveined
- 3 tbsp unsalted butter
- 2 tbsp olive oil
- 4 cloves garlic, minced
- 1/4 tsp red pepper flakes (optional)
- 1/2 cup chicken or vegetable broth
- 1/2 cup grated Parmesan cheese
- Zest and juice of 1 lemon
- Salt and black pepper, to taste
- 2 tbsp chopped fresh parsley
- 1/4 cup heavy cream (optional for richer sauce)
Instructions
- Heat a large skillet over medium heat and melt 2 tbsp butter with 2 tbsp olive oil.
- Sauté garlic: add 4 minced garlic and red pepper flakes for 30 seconds until fragrant.
- Cook shrimp: season shrimp with salt and pepper and sauté 1–2 minutes per side until pink; remove and set aside.
- Toast pasta: add dry linguine to the pan and pour in 1/2 cup broth plus 1 cup water (enough to mostly cover). Bring to a simmer.
- Simmer pasta: cook, stirring occasionally, until pasta is al dente and liquid reduces — about 8–10 minutes depending on pasta.
- Finish sauce: stir in 1/2 cup Parmesan, zest and juice of lemon, 1 tbsp butter, and 1/4 cup cream if using. Return shrimp to the pan to warm.
- Adjust seasoning and sprinkle 2 tbsp parsley before serving.
- Serve immediately.
How to Serve It
Plate with extra Parmesan and lemon wedges. A microplane zester brightens flavors. Leftovers refrigerate in airtight containers for 1–2 days — reheat gently on the stove with a splash of water or broth.
5. No-Fail Banana Bread

This moist banana bread is forgiving with overripe bananas and mixes easily by hand or with a mixer. It has a tender crumb and caramelized edges — perfect for breakfasts or snacks. Adding walnuts or chocolate chips is an easy variation beginners love.
Ingredients
- 1 3/4 cups all-purpose flour
- 1 tsp baking soda
- 1/2 tsp salt
- 1/2 cup unsalted butter, softened
- 1/2 cup granulated sugar
- 1/4 cup brown sugar, packed
- 2 large eggs, room temperature
- 1 1/2 cups mashed overripe bananas (about 3-4)
- 1/4 cup sour cream or Greek yogurt
- 1 tsp vanilla extract
- 1/2 cup chopped walnuts or chocolate chips (optional)
Instructions
- Preheat oven to 350°F (175°C) and grease a 9×5-inch loaf pan or line with parchment paper.
- Whisk dry: combine flour, baking soda, and salt in a bowl.
- Cream butter and sugars: using a hand mixer or KitchenAid stand mixer, beat butter, granulated sugar, and brown sugar until light, about 2 minutes.
- Add eggs: beat in eggs one at a time, then stir in vanilla.
- Add bananas and sour cream: mix in mashed bananas and 1/4 cup sour cream until combined.
- Fold dry ingredients into wet until just combined; stir in walnuts or chocolate chips if using.
- Bake 55–65 minutes until a toothpick inserted in center comes out clean or with a few moist crumbs.
- Cool in pan 10 minutes, then remove to a wire rack to cool completely.
How to Serve It
Slice and serve warm with butter or cream cheese. Store in a bread box or wrap in plastic and keep at room temp up to 3 days, or freeze sliced in freezer bags up to 3 months.
6. Crispy Baked Salmon with Dijon Herb Crust
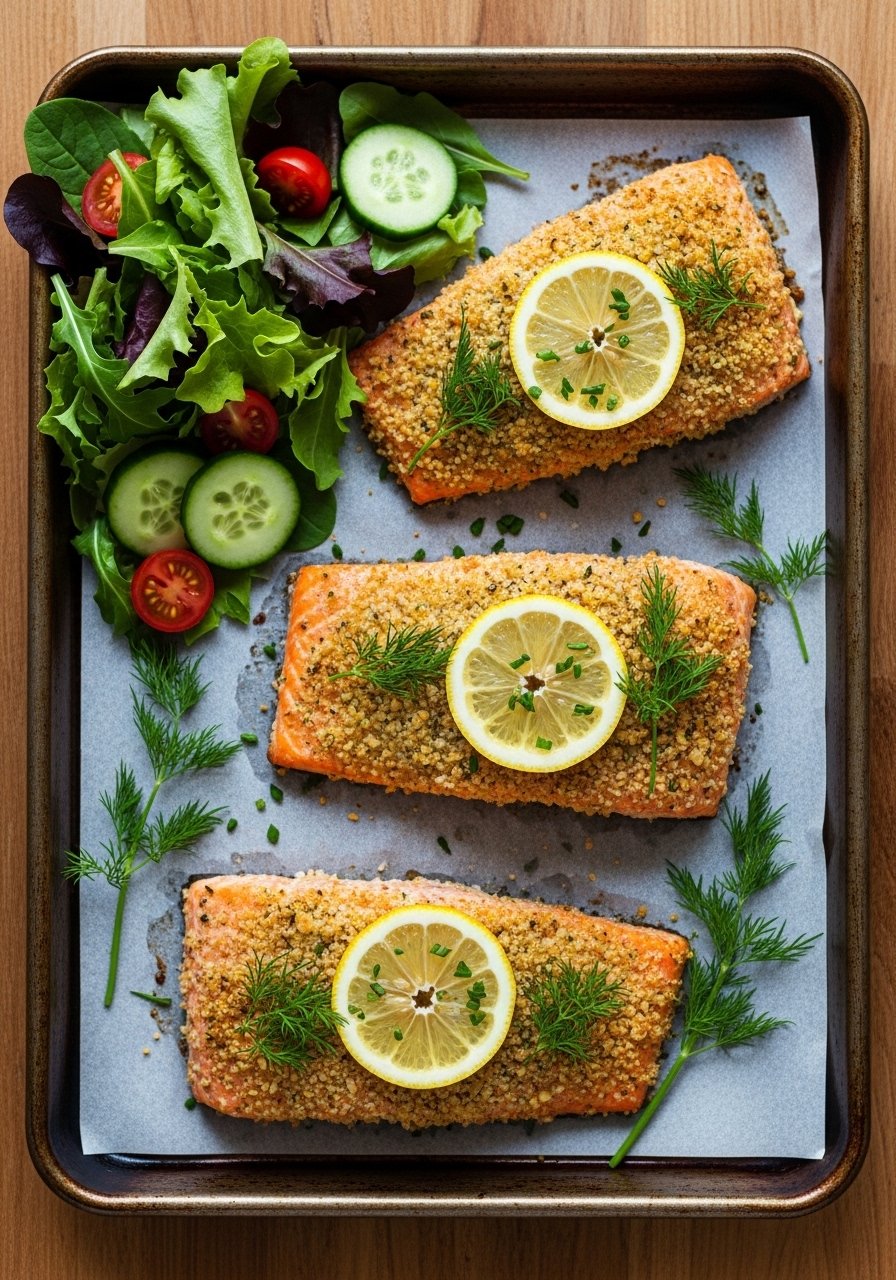
Baking salmon is quick and forgiving; the Dijon-herb crust adds bright, savory notes and keeps the fish moist. This recipe works for busy weeknights and looks restaurant-quality with minimal effort.
Ingredients
- 4 salmon fillets (6 oz each), skin on
- 2 tbsp Dijon mustard
- 1/4 cup panko breadcrumbs
- 2 tbsp grated Parmesan
- 1 tbsp olive oil
- 1 tbsp lemon zest
- 2 tbsp chopped parsley
- 1 tsp dried thyme
- Salt and black pepper
- Lemon wedges, for serving
- 1 tbsp melted butter (optional)
Instructions
- Preheat oven to 425°F (220°C) and line a baking sheet with silicone baking mat or parchment.
- Pat salmon dry and season with salt and pepper.
- Mix crust: in a bowl combine panko, Parmesan, lemon zest, parsley, thyme, and 1 tbsp olive oil.
- Spread 1/2 tbsp Dijon over each fillet.
- Press panko mixture over mustard-coated top of each fillet.
- Bake 10–14 minutes depending on thickness; fish is done at 125–130°F for medium or 145°F for well done (check with an instant-read thermometer).
- Optional: brush with 1 tbsp melted butter for shine before serving.
- Rest 2 minutes and serve with lemon wedges.
How to Serve It
Serve with roasted asparagus or a simple mixed greens salad. Present on a serving platter. Leftover salmon flakes well into salads or sandwiches and keeps in airtight containers for 2 days.
7. Simple Vegetable Stir-Fry (Beginner Recipes Veggie Delight)
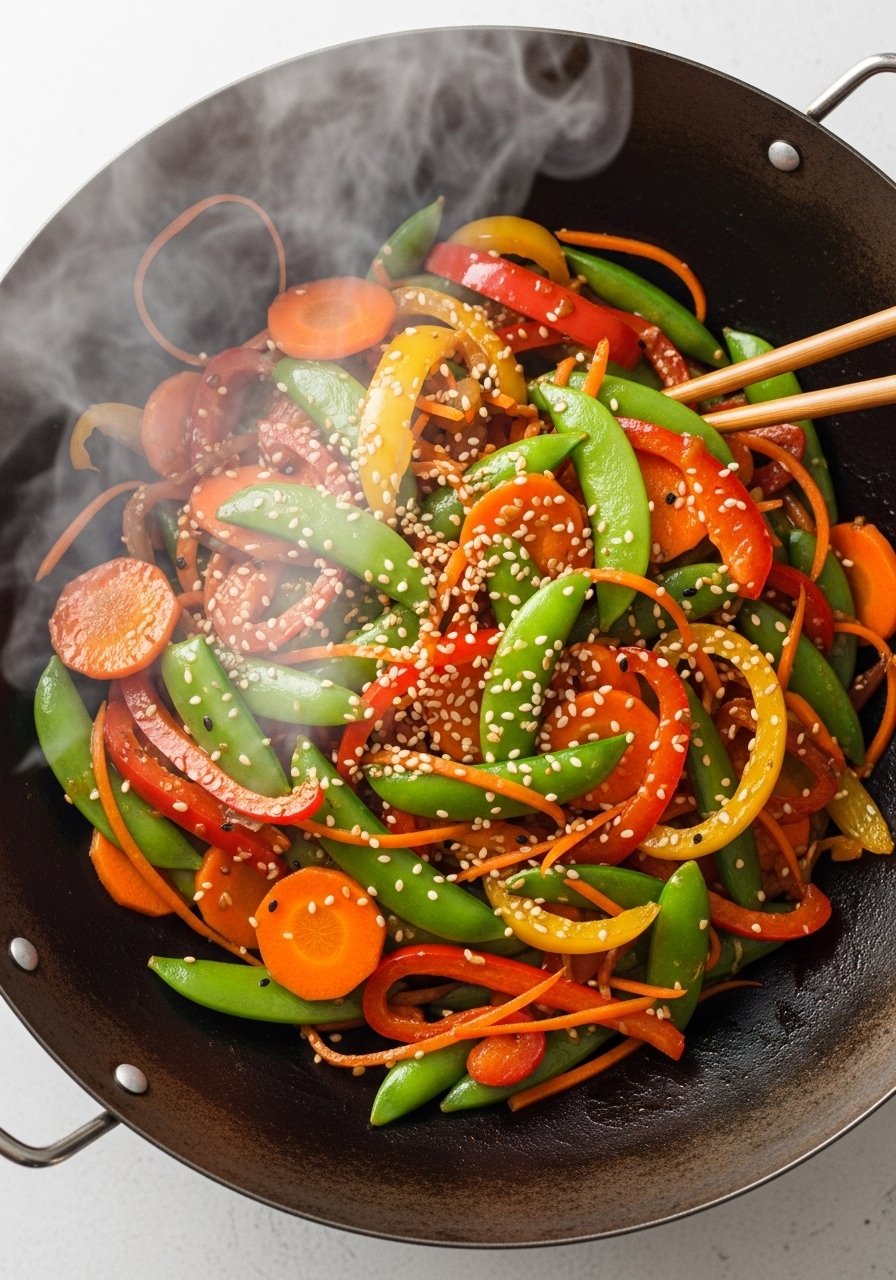
A stir-fry teaches heat control and quick cooking — vegetables stay crisp-tender with bright flavors. This is one of the easiest beginner recipes that adapts to whatever produce you have and can be made vegan or gluten-free.
Ingredients
- 2 tbsp vegetable or canola oil
- 1 red bell pepper, thinly sliced
- 1 yellow bell pepper, thinly sliced
- 1 medium carrot, julienned
- 1 cup snap peas
- 1 small broccoli crown, cut into florets
- 3 cloves garlic, minced
- 1 tbsp fresh ginger, minced
- 3 tbsp soy sauce (or tamari for gluten-free)
- 1 tbsp rice vinegar
- 1 tbsp honey or maple syrup
- 1 tsp toasted sesame oil
- 2 tbsp sliced green onions
- 1 tbsp sesame seeds
- Cooked rice or noodles, for serving
Instructions
- Prep all veggies before cooking — stir-frying goes fast.
- Heat a wok or large skillet over high heat until very hot; add 2 tbsp oil.
- Sauté aromatics: add ginger and garlic and stir 30 seconds.
- Add dense veggies: add carrots and broccoli, stir-fry 2–3 minutes.
- Add peppers and snap peas: stir-fry 2 minutes until crisp-tender.
- Make sauce: whisk 3 tbsp soy, 1 tbsp rice vinegar, 1 tbsp honey, and 1 tsp sesame oil in a small bowl.
- Toss: pour sauce over veggies and toss 1–2 minutes until veggies are glossy and coated.
- Finish with green onions and sesame seeds.
- Serve over hot rice or noodles.
How to Serve It
Serve with steamed rice or toss with noodles and a splash of toasted sesame oil. Use a carbon steel wok for authentic stir-fry results. Leftovers keep in airtight containers for 2–3 days — reheat in a hot skillet to refresh texture.
8. Chewy Chocolate Chip Cookies
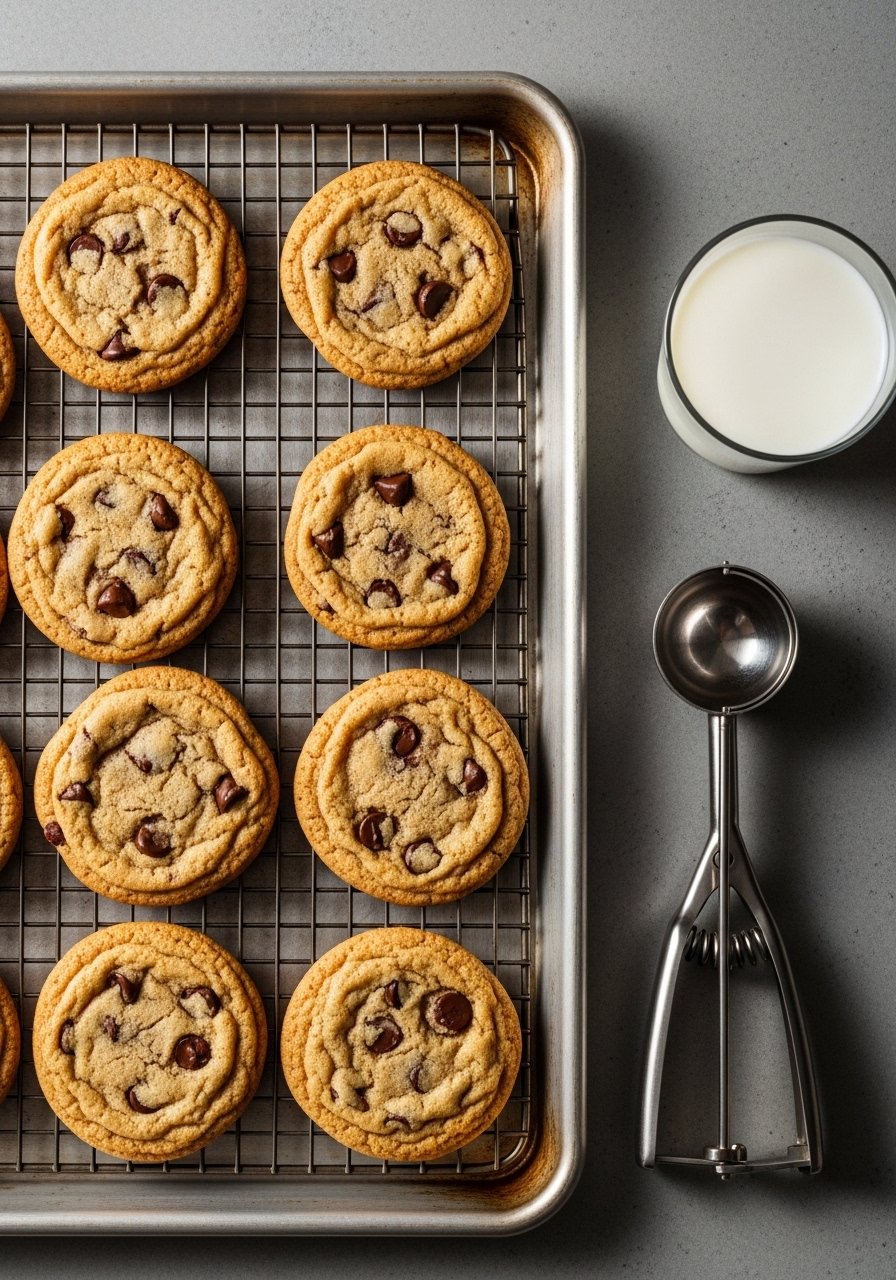
This cookie recipe makes soft, chewy centers with slightly crisp edges. It uses brown sugar for chew and an initial chill for controlled spread. It's a classic beginner recipe that teaches dough handling and baking temperature.
Ingredients
- 2 1/4 cups all-purpose flour
- 1 tsp baking soda
- 1/2 tsp salt
- 3/4 cup unsalted butter, softened
- 3/4 cup packed brown sugar
- 1/4 cup granulated sugar
- 2 large eggs, room temperature
- 2 tsp vanilla extract
- 2 cups semisweet chocolate chips
- 1 cup chopped pecans or walnuts (optional)
- Optional: flaky sea salt for finishing
Instructions
- Preheat oven to 350°F (175°C) and line baking sheets with a silicone baking mat or parchment.
- Whisk flour, baking soda, and salt in a bowl.
- Cream butter and sugars using a mixer or hand mixer until light and fluffy, about 2 minutes.
- Add eggs one at a time, then vanilla.
- Fold in dry ingredients until combined, then stir in chocolate chips and nuts if using.
- Chill dough 15–30 minutes for better texture.
- Scoop 2 tbsp rounded dough balls onto sheet spaced 2 inches apart.
- Bake 10–12 minutes until edges are light golden and centers look soft.
- Remove and sprinkle with flaky sea salt if desired; cool on rack.
How to Serve It
Serve warm with milk or coffee. Present on a wooden cookie board for guests. Store in an airtight cookie jar at room temperature for up to 5 days or freeze dough balls for later baking.
9. Creamy Tomato Basil Soup (Vegan Option)
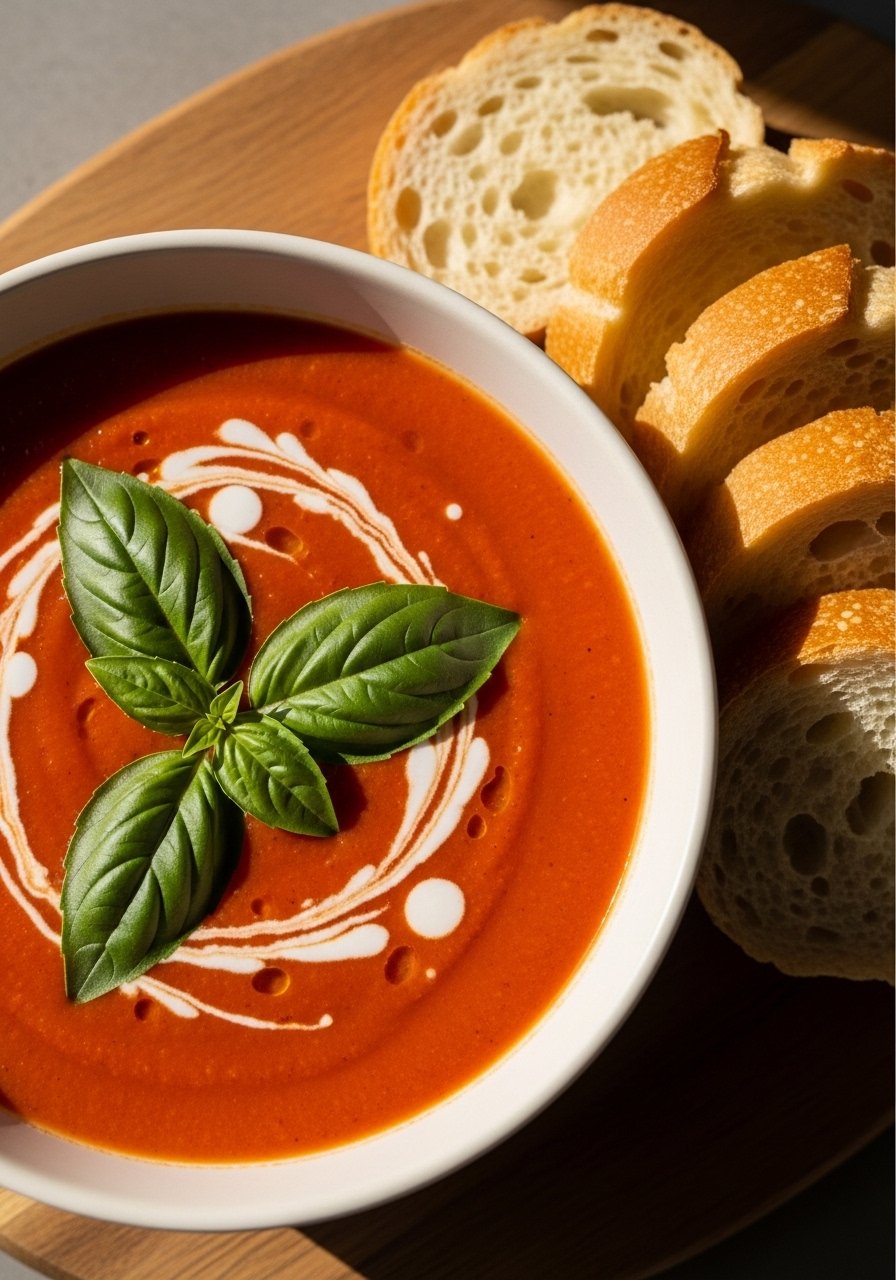
This soup is silky, slightly sweet, and herb-forward. Use canned San Marzano tomatoes for consistent flavor, and an immersion blender makes quick work of pureeing. It’s a comforting beginner recipe that’s easy to adapt to dairy-free diets.
Ingredients
- 2 tbsp olive oil
- 1 medium onion, diced
- 3 cloves garlic, minced
- 1 carrot, peeled and diced
- 1 (28 oz) can San Marzano tomatoes
- 1 cup vegetable broth
- 1/2 cup coconut milk or heavy cream
- 1 tbsp tomato paste
- 1 tsp sugar (balances acidity)
- Salt and black pepper
- 1/4 cup fresh basil leaves, chopped
- Crusty bread for serving
Instructions
- Heat 2 tbsp olive oil in a large pot over medium heat.
- Sauté onion and carrot until soft, about 6–8 minutes. Add garlic and sauté 30 seconds.
- Stir in tomato paste, cook 1 minute, then add canned tomatoes and 1 cup broth.
- Bring to a simmer and cook 15–20 minutes to meld flavors.
- Blend: use an immersion blender to puree until smooth, or carefully transfer to a blender in batches.
- Stir in 1/2 cup coconut milk, sugar, and basil, and heat gently — do not boil.
- Season to taste and serve hot.
How to Serve It
Ladle into bowls and garnish with extra basil and a swirl of cream. Serve with toasted baguette or grilled cheese. Keep leftovers in an airtight container for 3–4 days; soup freezes well.
10. Easy No-Knead Artisan Bread
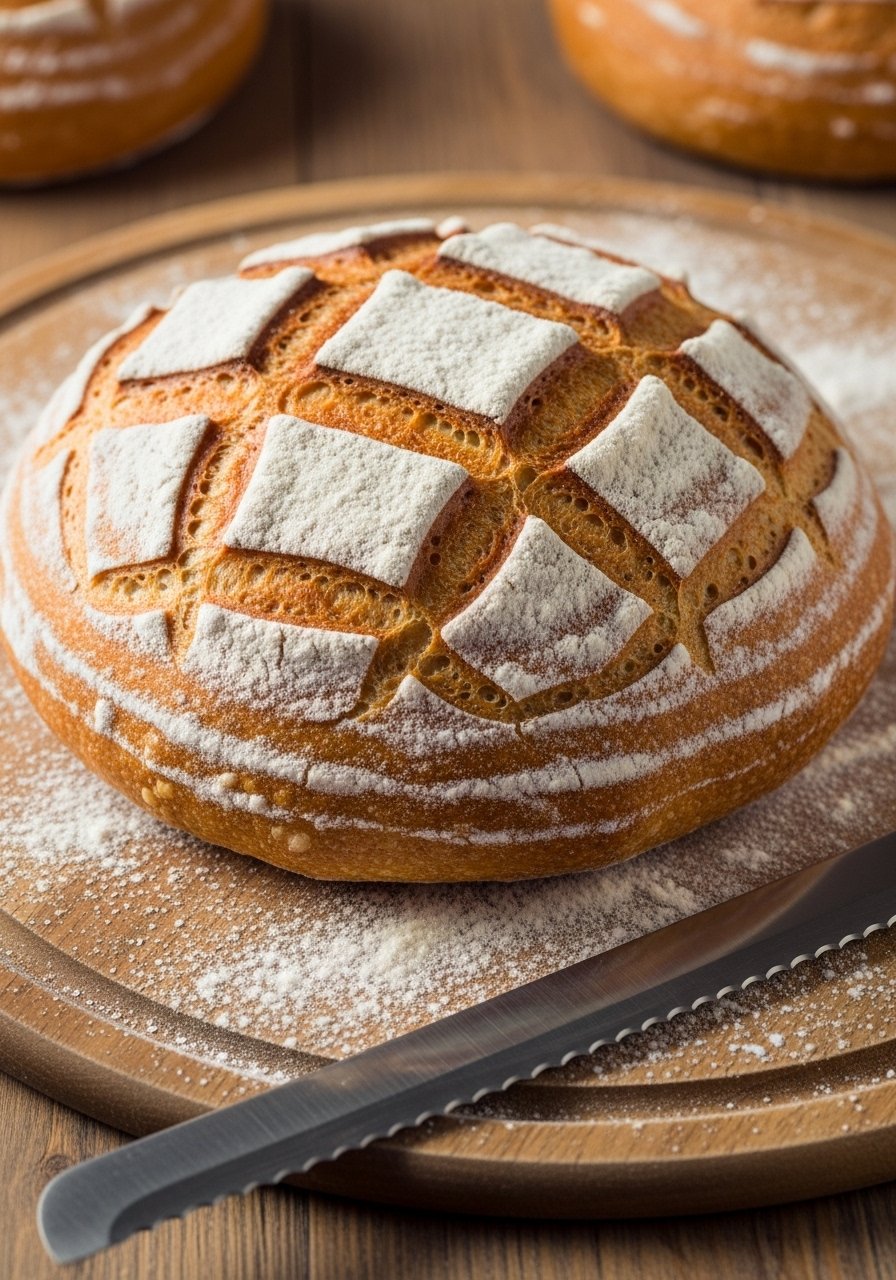
No-knead bread delivers a crisp crust and open crumb with minimal effort. It’s an impressive beginner bread that teaches fermentation and timing rather than complicated technique. A Dutch oven helps mimic bakery steam for the best crust.
Ingredients
- 3 cups all-purpose flour
- 1 1/4 tsp fine sea salt
- 1/2 tsp instant yeast
- 1 1/2 cups lukewarm water (about 80–90°F)
- Extra flour, for dusting
- Cornmeal or parchment paper to line pot
Instructions
- In a large bowl, whisk flour, salt, and yeast.
- Add water and stir with a wooden spoon until a shaggy dough forms.
- Cover bowl with plastic wrap and let rest at room temp 12–18 hours until doubled and bubbly.
- Preheat oven to 450°F (230°C) with a Dutch oven inside for 30 minutes.
- Turn dough onto floured surface, shape lightly into a ball — do not knead.
- Place dough on parchment or cornmeal, score the top with a sharp knife.
- Carefully transfer into hot Dutch oven, cover, and bake 30 minutes.
- Remove lid and bake 10–15 minutes until crust is deep golden.
- Cool on a wire rack at least 1 hour before slicing.
How to Serve It
Slice and serve with butter or olive oil. Use a serrated bread knife for clean slices. Store wrapped in a cloth or in a bread box up to 2 days, or freeze sliced in freezer bags.
11. Oven-Baked Crispy Fries
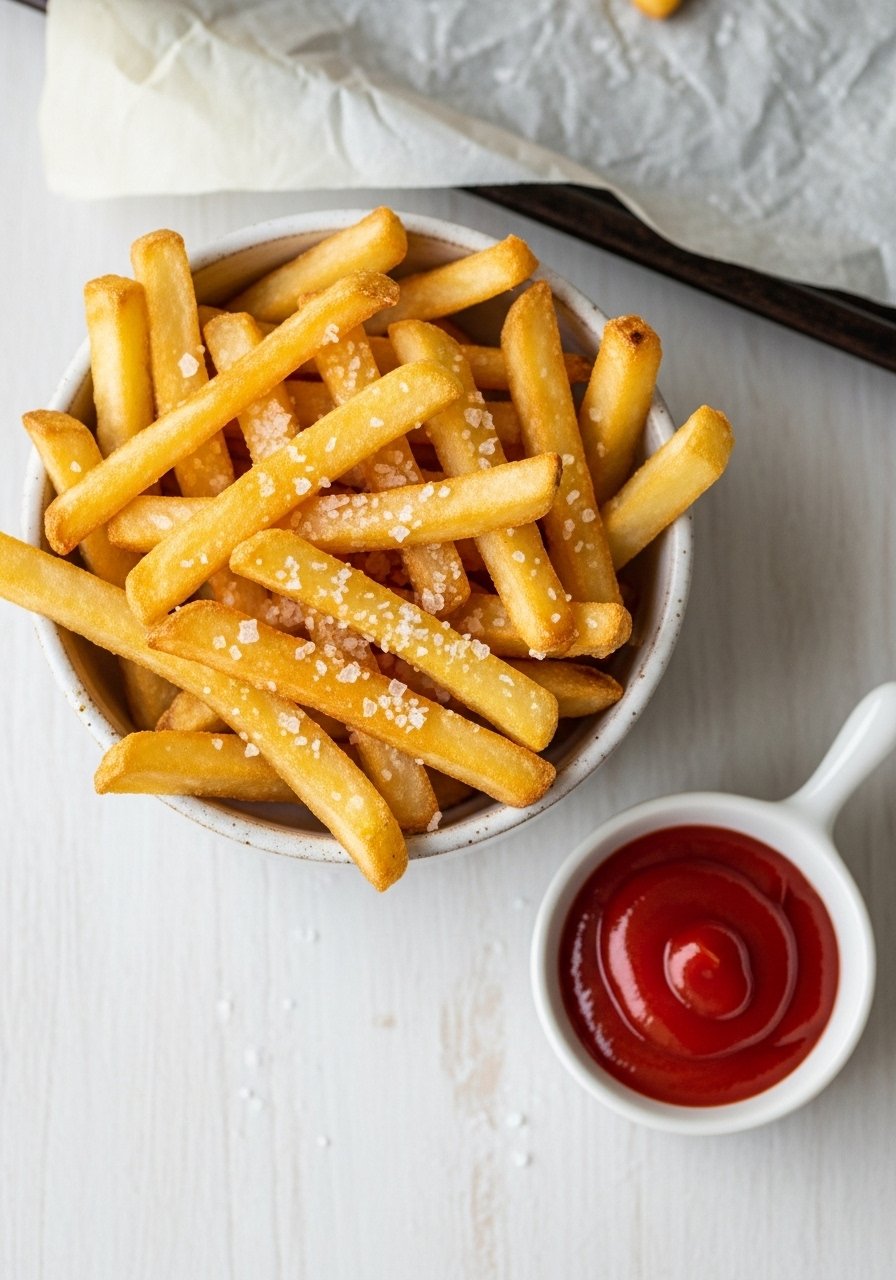
These oven-baked fries are crispy on the outside and fluffy inside, without deep-frying. A soak step and high-heat roast help achieve crunch — a beginner recipe that teaches starch rinsing and drying.
Ingredients
- 2 lbs russet potatoes
- 3 tbsp vegetable oil
- 1 tsp cornstarch
- 1 tsp garlic powder
- 1 tsp paprika
- 1 tsp kosher salt
- 1/2 tsp black pepper
- 2 tbsp grated Parmesan (optional)
- Chopped parsley, for garnish
- Ketchup or aioli, for serving
Instructions
- Preheat oven to 450°F (230°C) and line two baking sheets with parchment paper or a silicone baking mat.
- Cut potatoes into 1/4–1/2 inch sticks and soak in cold water at least 30 minutes (up to 2 hours).
- Drain and dry thoroughly — moisture prevents crisping.
- Toss dry fries with 3 tbsp oil, 1 tsp cornstarch, and seasonings.
- Spread fries in a single layer on baking sheets, not crowded.
- Bake 20 minutes, flip and rotate pans, bake another 15–20 minutes until golden and crisp.
- If using Parmesan, sprinkle during the last 5 minutes.
- Season with extra salt and parsley; serve hot.
How to Serve It
Serve in a bowl or cone with ketchup or garlic aioli. A wire cooling rack helps drain oil before serving. Store leftover fries in the fridge and reheat in an air fryer for best texture.
12. Mason Jar Greek Salad (Meal Prep Friendly)
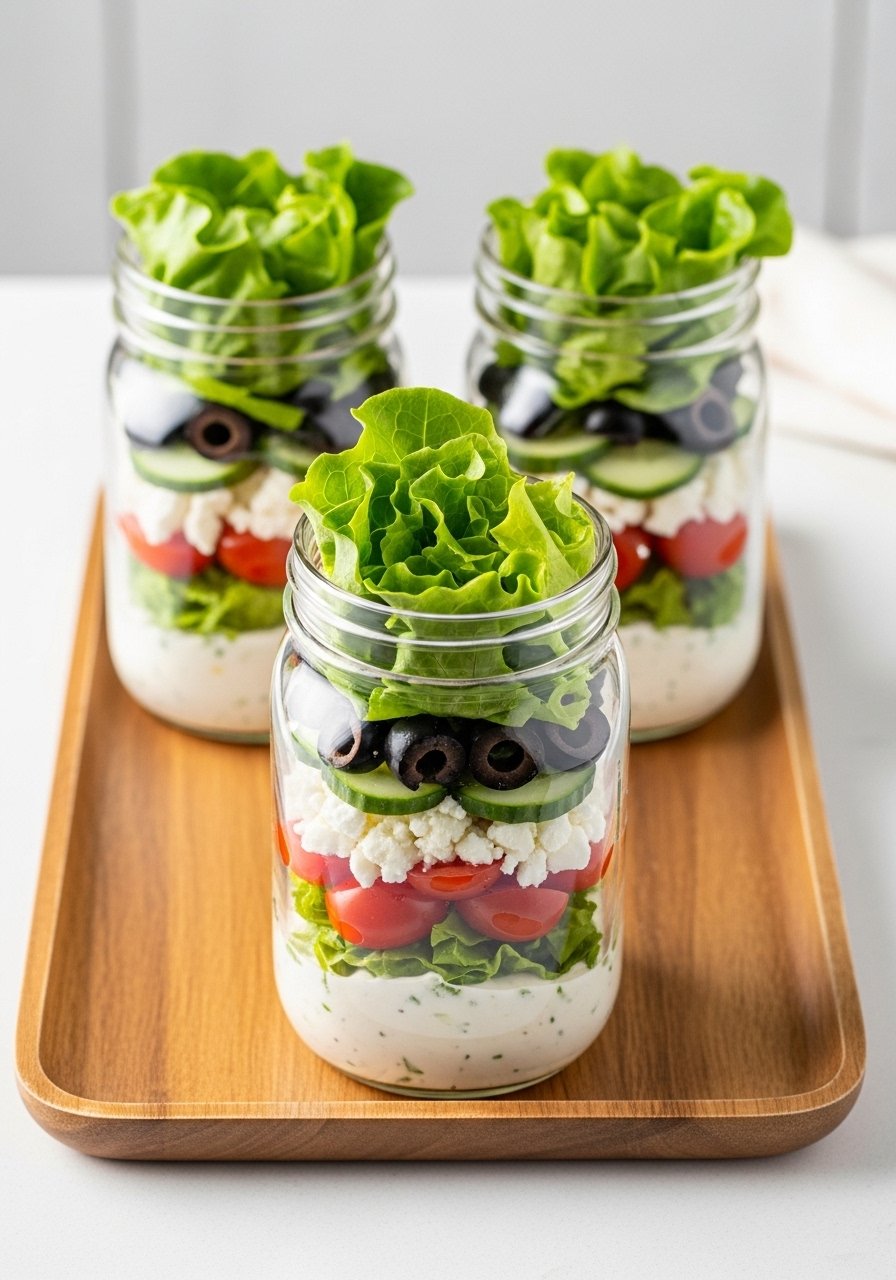
Layered mason jar salads make healthy eating convenient and portable. They’re crisp, tangy, and customizable. Building the jar in the right order keeps greens crisp — an easy beginner recipe for lunches and meal prep.
Ingredients (per jar, makes 4 jars)
- 1/4 cup Greek dressing (store-bought or homemade)
- 1/2 cup cherry tomatoes, halved
- 1/2 cup cucumber, diced
- 1/2 cup canned chickpeas, rinsed
- 1/4 cup red onion, thinly sliced
- 1/2 cup feta cheese, crumbled
- 1/4 cup Kalamata olives, pitted
- 2 cups chopped romaine lettuce
- Salt and pepper, to taste
- Lemon wedges (optional)
Instructions
- Add dressing to bottom of each Mason jar.
- Layer sturdy veggies next: tomatoes, cucumber, chickpeas, and onion — these won’t soak through.
- Add feta and olives as barrier layers.
- Top with romaine lettuce and seal jars tightly.
- Refrigerate up to 4 days.
- To serve, shake jar into a bowl or pour onto a plate and toss.
How to Serve It
Serve straight from the jar or plated with toasted pita. Store in a set of glass meal prep containers if you prefer. Make variations with grilled chicken or quinoa for heartier lunches.
13. Overnight Oats with Mixed Berries (No-Cook Breakfast)
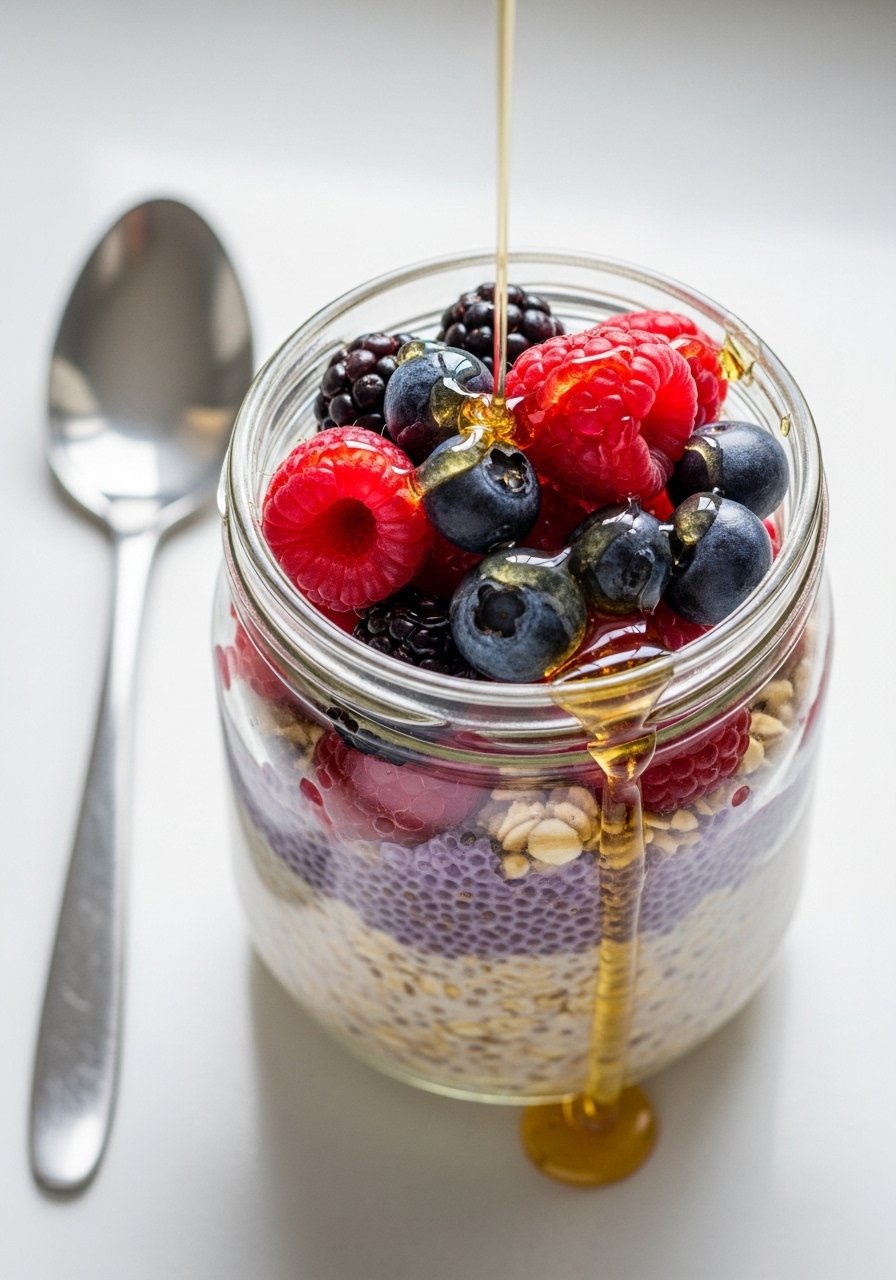
Overnight oats are a no-cook breakfast that’s creamy, customizable, and perfect for busy mornings. They teach basic ratios for soaking oats and offer endless flavor combos — a great starter recipe for anyone building staple breakfasts.
Ingredients (serves 1; multiply as needed)
- 1/2 cup rolled oats
- 1/2 cup milk or plant milk
- 1/4 cup Greek yogurt or dairy-free yogurt
- 1 tbsp chia seeds
- 1 tbsp maple syrup or honey
- 1/2 tsp vanilla extract
- 1/2 cup mixed berries (fresh or frozen)
- 1 tbsp nut butter (optional)
- Pinch of salt
Instructions
- In a jar or bowl, combine oats, milk, yogurt, chia seeds, maple syrup, vanilla, and pinch of salt.
- Stir well, top with mixed berries and a dollop of nut butter if using.
- Seal jar and refrigerate at least 6 hours or overnight.
- Stir before eating; add more milk to loosen if needed.
- Eat cold or warm briefly in the microwave.
How to Serve It
Top with toasted nuts, granola, or extra fruit. Store in Mason jars for grab-and-go breakfasts. Keeps up to 4 days in the fridge.
These 13 beginner recipes give you a full toolbox of flavors and techniques — from gentle heat for eggs to higher-temp roasting and quick stovetop skills. Try one this week and pin the post for later so you can come back when you’re ready to cook again. Which recipe will you make first — a cozy loaf of no-knead bread, weekday lemon chicken, or weekend pancakes? Share this with a friend who’s just starting out in the kitchen, and consider using a good silicone baking mat set; it saves cleanup and helps many of these recipes release cleanly from pans.

Related posts:
 7 Lazy Crockpot Meals That Cook While You Relax
 11 Brilliant One-Pot Meals With Almost No Cleanup
 10 Lightning-Fast Dinner Recipes Ready in 30 Minutes
 How to Use an Air Fryer for Crispy Easy Meals
 How to Cook Ground Beef Without Drying It Out
 10 Juicy Shrimp Recipes Ready in Minutes
 6 Powerful Instant Pot Recipes That Save Hours
 11 Shockingly Easy Recipes Anyone Can Master